The complete guide to Amiga Imager 1.0 beta — building ready-to-boot Amiga systems on your Mac. From your first Guided Build to PiStorm boards, USB, real floppy drives, your WHDLoad game collection in iGame on first boot, and the Amiga File Manager.
Amiga Imager is a native macOS app that builds complete, ready-to-boot Amiga systems
in one workflow: pick your hardware, point the app at your AmigaOS media and Kickstart
ROM, choose optional software, and get a finished disk image — or write it straight to
an SD/CF card. Everything runs in-process in native Swift; there are
no external tools, scripts, or dependencies involved.
PiStorm / Emu68 and Classic Amiga builds produce .img files (or write directly to a card).
Emulator builds (MiSTer/Minimig, UAE, Amiberry) produce .hdf files; the UAE and Amiberry profiles also write companion .uae (WinUAE/Amiberry) and .fs-uae (FS-UAE) configs next to the image.
Optional community software — over 30 packages — can be installed during the build, fully configured and with tidy Workbench icons.
Point the build at your WHDLoad game collection and your games are in iGame on first boot — index pregenerated, no scan. ScummVM comes with four freeware adventures, launcher-ready.
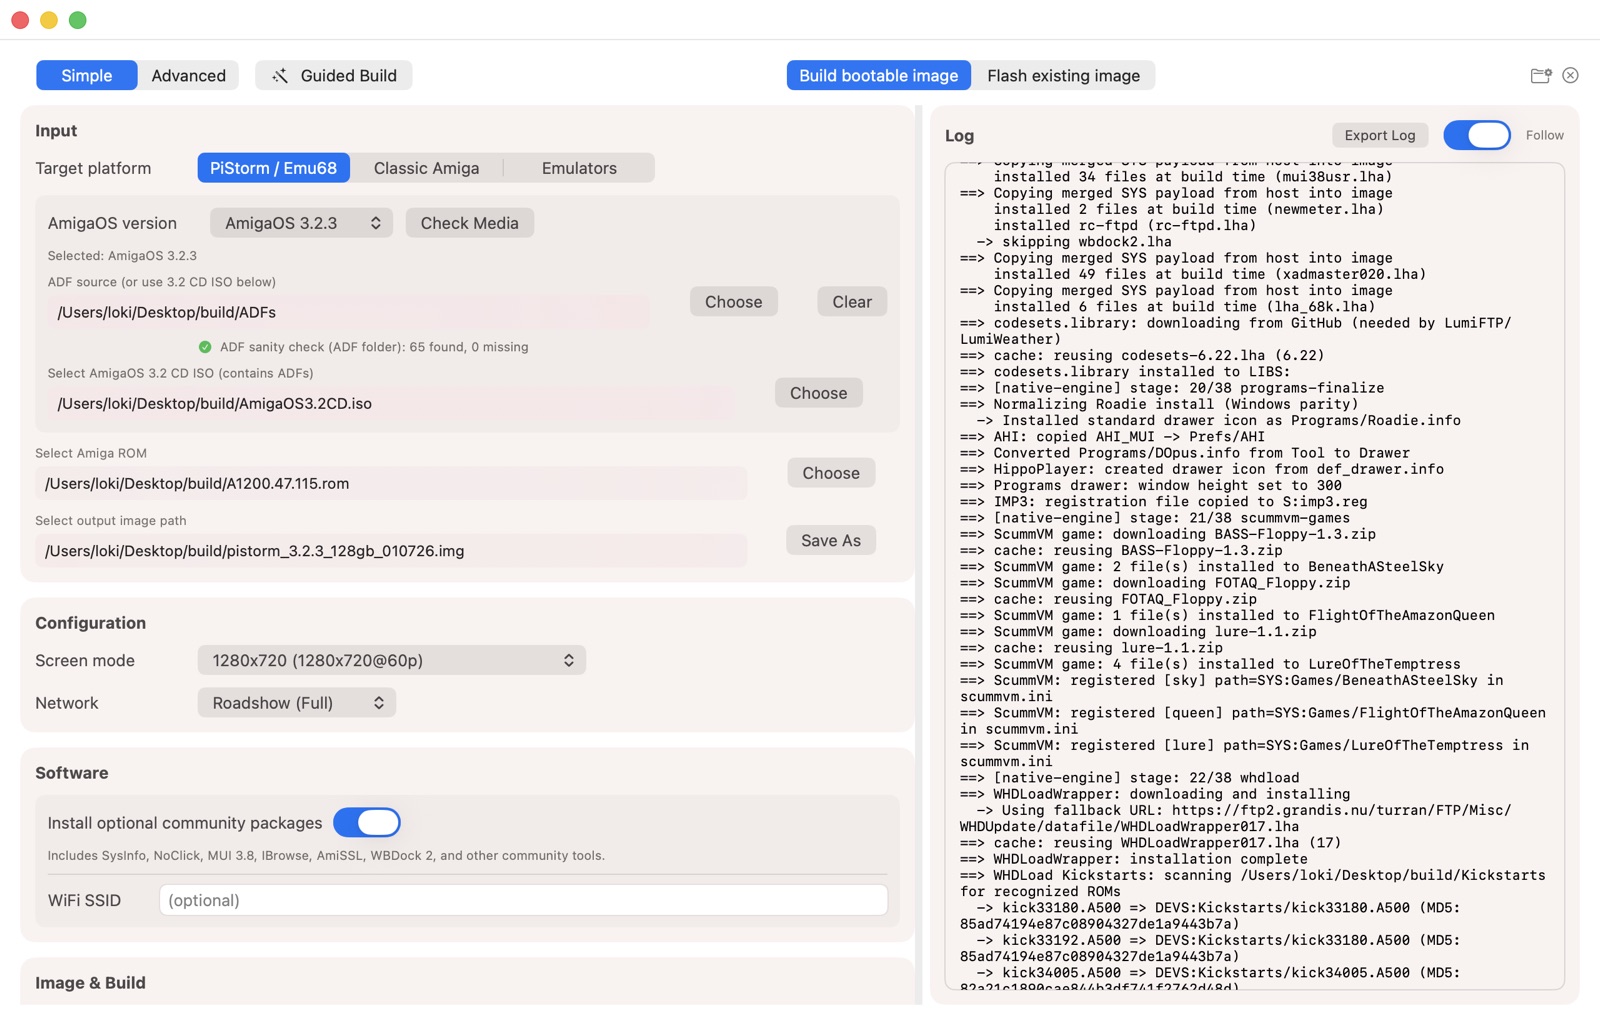
The build screen in Simple mode — platform, media, ROM, and output in one place, with the live build log beside it.
What you need
a Mac running macOS 14 Sonoma or later (Apple Silicon or Intel)
a valid Kickstart ROM for your target
matching AmigaOS installation media — see Appendix A for exactly what each OS version needs
a destination SD, CF, or USB device if you plan to write the image immediately
internet access for the first build (everything downloaded is cached; later builds run fully offline)
Optional, if you own them:
a paid Picasso96 archive from Individual Computers — recommended for Classic RTG cards, and also used as the active RTG core on PiStorm when supplied
a licensed Roadshow.lha for the full TCP/IP stack (otherwise the bundled demo is used)
registration/key files for IBrowse or IMP3
Amiga Imager does not bundle AmigaOS or Kickstart ROMs — you supply your own licensed
copies (for example from an AmigaOS 3.2 purchase or Amiga Forever).
Staying up to date
Amiga Imager checks for newer releases once a day (and on demand via
Amiga Imager → Check for Updates…). The check reads a
cryptographically signed version manifest — verified against a key
built into the app, so the web server is never trusted — and shows a quiet banner
with a Details button when a newer release exists. Nothing downloads or
installs itself: updating is always your click on the download page. The
automatic check can be switched off in
Settings → Build → Check for app updates at launch.
2. Quick start — the Guided Build
New to Amiga Imager? Click Guided Build in the toolbar. It is a
full-screen wizard that walks you through one decision at a time, with a plain-language
tip on every screen. It drives the same build engine as the normal form, so the result
is identical — it just makes the choices easier to find.
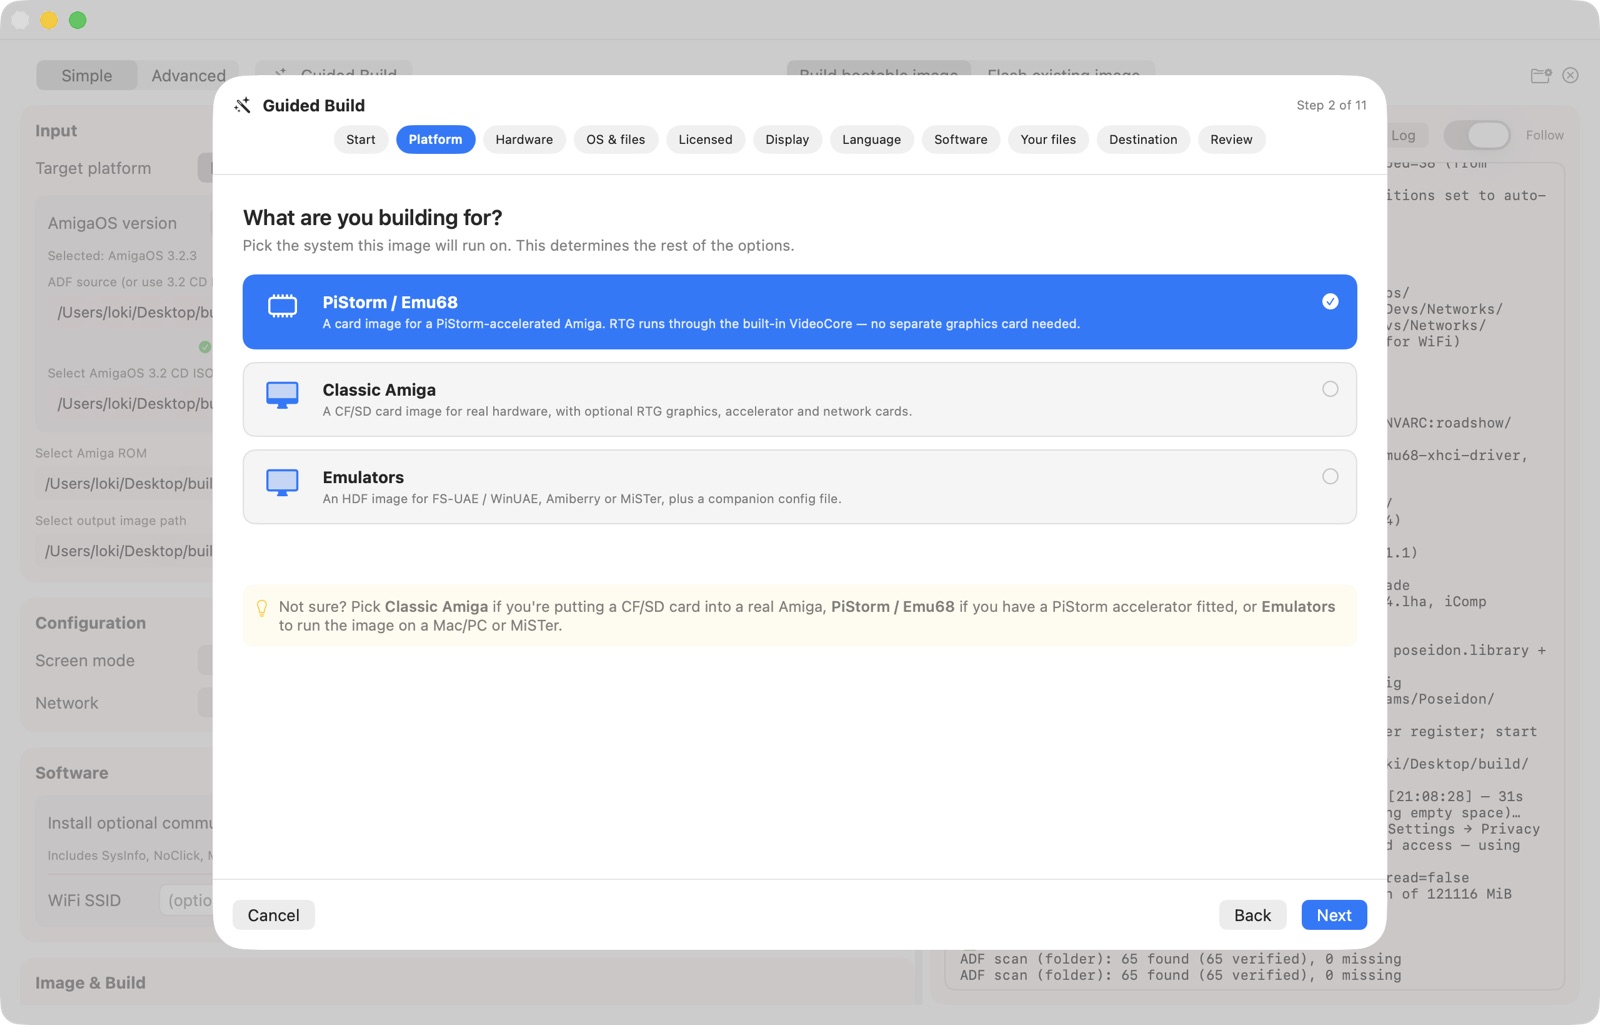
The Guided Build wizard: one decision at a time, with a tip on every step.
The wizard adapts to your platform and covers, in order:
Welcome — what you'll need: a Kickstart ROM and AmigaOS install media.
Platform — PiStorm / Emu68, Classic Amiga, or an emulator (with its profile), on large labelled cards.
Hardware — Classic: machine, accelerator, RTG card, network card. PiStorm: board type, FrameThrower, and Wi-Fi. (Skipped for emulators.)
AmigaOS & install files — version, Kickstart ROM, and an ADF folder or CD ISO. A live check confirms the media before you continue.
Language & region — locales to install; your Mac's language and region are pre-selected.
Licensed files — optional paid add-ons you own: Picasso96 (iComp), Roadshow (full), IBrowse key, IMP3 registration. Leave any blank to skip.
Your own files — optionally copy a folder into a Transfer drawer on the image.
Display, Software (an all-or-none set of community tools), and Size & destination (save to a file or write straight to a card).
Review & build — a summary of every choice; the build starts when you confirm.
Networking is chosen for you from the Licensed files step: supply your Roadshow archive
for the full stack, otherwise the bundled demo is used. A disabled Next
always explains what is still missing, and the tab strip lets you jump back to any
earlier step.
3. Building a bootable image
The three build modes
Build bootable image is the main mode: select a platform, point the app
at your media and ROM, choose software, review the Build Summary, and
generate a ready-to-use image.
Build blank image creates the same partitioned, formatted disk structure
without installing an OS — and can pre-fill each partition from a folder on your
Mac (see the power-user guide).
Flash existing image writes an already-built image to removable media —
choose the image, choose the disk, click Write to Disk
(see chapter 7).
Simple or Advanced
Simple is the fastest route. It applies safe defaults for a first
build: bundled assets, EN plus your system locale, Roadshow
Demo, and the shareware Picasso96 path when RTG is needed.
Advanced is where the full app lives — custom hardware, manual Roadshow
or Picasso96 archives, transfer folders, registration files, custom image sizing and
partition layout, and profile save/load.
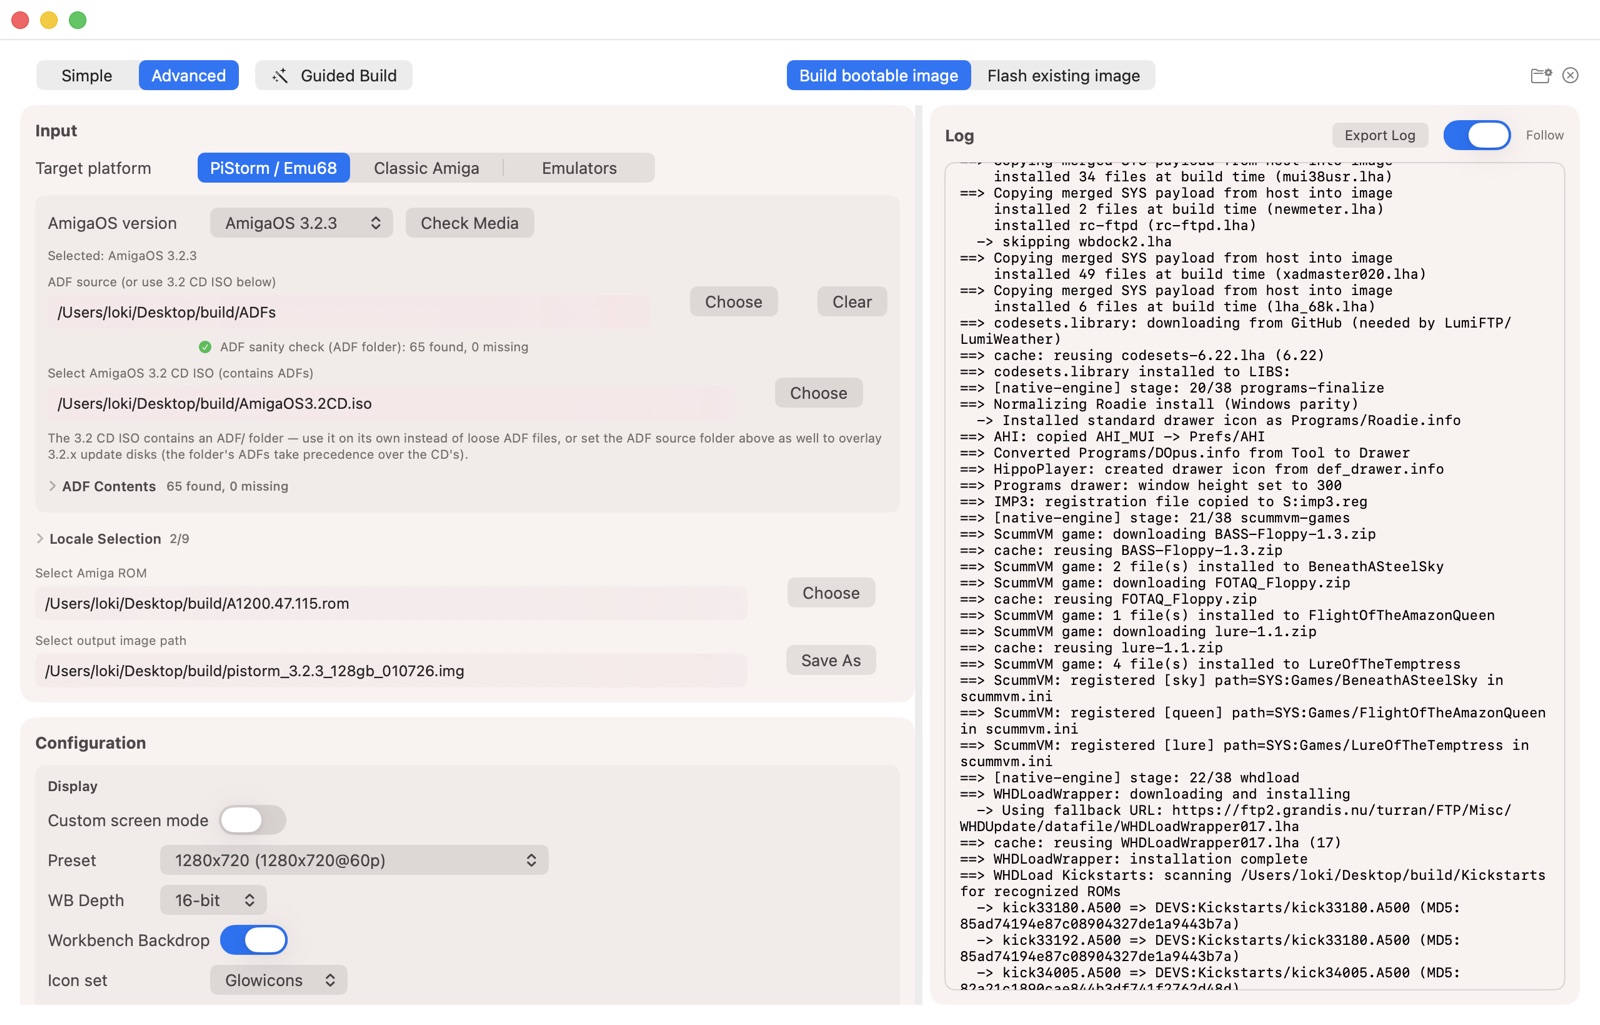
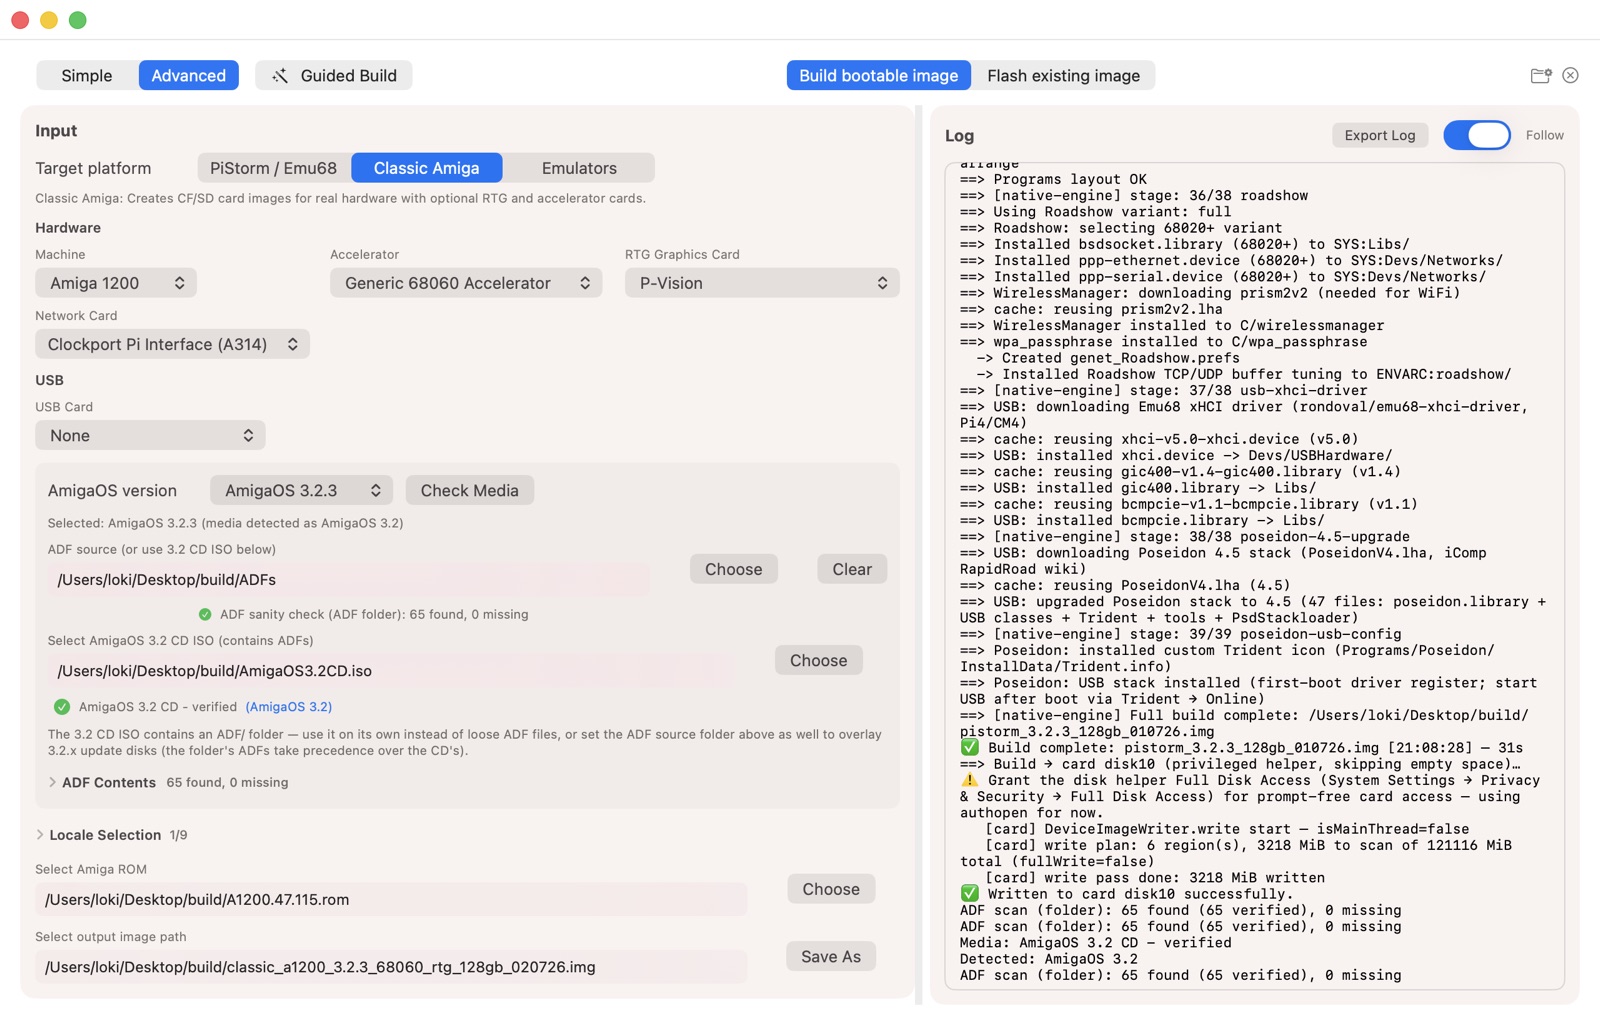
Advanced mode: the Input card with the platform selector, combined ADF folder + 3.2 CD ISO media, Kickstart ROM, and the auto-named output image.
The Input card
Target platform: PiStorm / Emu68, Classic Amiga, or Emulators (with a profile picker for MiSTer, UAE, and Amiberry).
AmigaOS version: keep it on Auto where possible and use Check Media to verify what the app found.
Install media: an ADF source folder, a CD ISO, or both. For AmigaOS 3.2 you can point the app at a 3.2 CD ISO (the kind that holds an ADF/ folder) and additionally at a folder of 3.2.x update disks — the build combines them, with the folder's ADFs taking precedence. The media check reads the combined view, so it reports exactly what the build will use.
ADF folders are read flat: the build uses only the top level of the selected folder — disks inside subfolders are not staged. If you pick a parent folder by mistake, the app helps out: a folder whose disks all sit in a single subfolder is adopted automatically, and otherwise the media check shows a warning with a one-click "Use <subfolder> instead" button.
Amiga ROM: your Kickstart file. The check shows a green checkmark for a checksum-verified ROM, and a yellow checkmark for a ROM recognized by its Kickstart header (e.g. "Kickstart 47.115 (AmigaOS 3.2.3) - recognized by ROM header") — Hyperion ships several binary variants per release, so a yellow checkmark on an official download is perfectly fine. Only a genuinely unidentifiable file shows as Unknown ROM.
Output image: pre-filled with a self-describing name derived from your configuration — for example classic_a1200_3.2.3_68060_rtg_64gb_150626.img — defaulting to Downloads. It updates as you change settings. In Save As, choosing only a folder keeps the automatic name; typing a name of your own fixes it, and Use automatic name under the field switches back.
On Classic builds the Input card also holds the hardware selectors: Machine, Accelerator, RTG Graphics Card, Network Card, and USB Card.
The Configuration card
Display: preset or custom screen mode, Workbench depth, backdrop, icon set. The selected RTG mode is written directly into the image's preferences, so the machine comes up in the right mode on first boot.
P96 iComp archive: your commercial Picasso96 archive (used for Classic RTG cards, and as the active RTG core on PiStorm).
FrameThrower: PiStorm-only HDMI video capture — mode, autostart, scaling, size, brightness, contrast (see chapter 4).
USB: PiStorm-only toggle to include the USB host stack (see chapter 4).
Network: None, Roadshow (Demo), or Roadshow (Full), plus Wi-Fi where supported.
Transfer Folder: copy a folder from your Mac into the chosen Amiga partition during the build.
Locales: which language catalogs are installed; your Mac's region is pre-selected.
The Optional Software card
Simple mode offers a one-switch community package set. Advanced mode exposes grouped
selection with over 30 packages across Internet, Multimedia, Utilities, and System
categories — browsers, players, file managers, dock and desktop tools, and more. Some
packages reveal extra fields when selected (WHDLoad Kickstarts folder, IBrowse key,
IMP3 registration). You can also register your own LHA archives as
custom packages in Settings → Packages; they install to
SYS:Programs/<Name>.
IMP3 community tools (Settings → Packages, off by default, applies to every
platform) stages the prerequisite libraries and C: tools the Amiga Germany
IMP3 chat client needs — Triton (OpenTriton), ReqTools, RexxReqTools,
RexxTricks, TritonRexx, plus ActivateWindow, RawInsert,
Redit, Uptime, aget and utf8Decode —
all downloaded from Aminet at build time. The IMP3 client's own ARexx scripts are the
community's to distribute, so add those from the channel.
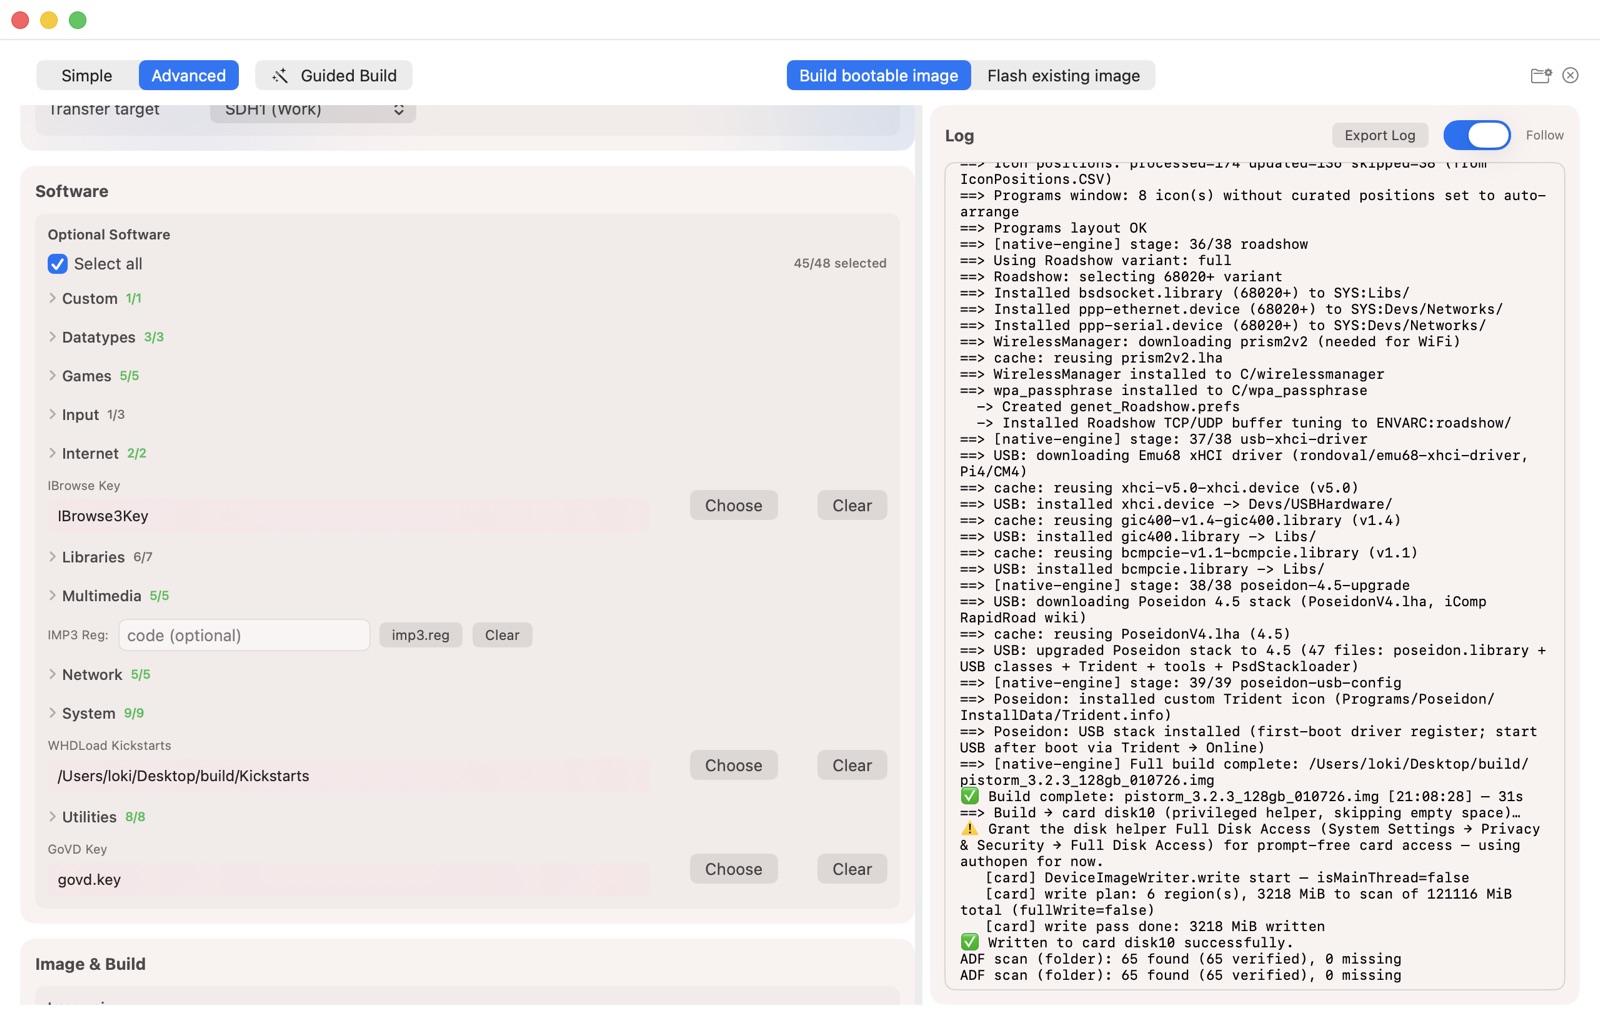
Optional Software in Advanced mode — grouped packages, with key fields (IBrowse, IMP3, WHDLoad, GoVD) appearing where needed.
Your WHDLoad game collection — playable on first boot
If you have a WHDLoad game library on your Mac — a folder of game archives
(.lha, as shipped by the usual retroplay-style collections),
already-extracted game drawers, or a mix of both — Amiga Imager can install it
during the build. In the WHDLoad Games section, set
Games collection to that folder; two further fields appear:
Games target — which partition the games land on. The default,
Automatic, uses the first data partition (for example DH1:) so the
boot partition stays lean.
Drawer name — the drawer that holds the collection
(default WHDGames).
The build extracts every archive and copies every game drawer into
<partition>:<drawer>/, keeping your collection's own folder
structure. If your library is organized A–Z, keep it that way —
thousands of drawers in one flat directory make Amiga filesystem listings crawl, so the
A–Z layout is preserved deliberately.
Everything the games need comes along automatically:
The WHDLoad runtime and the iGame launcher are
auto-included in the package selection — you don't have to tick them yourself.
The iGame games index is pregenerated during the build, with each
game's title read from its WHDLoad slave. Open iGame on the very first boot and your
games are already listed — no scan needed. (iGame's repository config is also written,
so a manual Scan on the Amiga rebuilds the same list.)
The build knows the exact uncompressed size of the collection before
copying (LHA archives carry it in their headers) and stops with a clear message if the
target partition is too small — instead of failing halfway through a multi-gigabyte
copy. Size the image generously for large collections.
A single broken archive doesn't abort the build: the game is skipped and reported in
the build log, and everything else installs.
One thing to add yourself: many WHDLoad games need Kickstart images
(kick 1.3 / 3.1) in DEVS:Kickstarts to run. Point the WHDLoad
Kickstarts folder field at your own licensed ROM image files — the Build Summary
warns you if a games collection is set without one. As with AmigaOS itself, Amiga Imager
does not bundle these.
WHDLoad games are skipped in blank-image mode (there is no OS to launch them from).
ScummVM and the free adventure games
The ScummVM 2.5.1 RTG package (NovaCoder's 68060 port, which opens on a
Picasso96 screen) comes with four classic point-and-click adventures that their creators
have released as freeware, selectable individually in the Games group:
Beneath a Steel Sky (Revolution Software)
Flight of the Amazon Queen (John Passfield & Steve Stamatiadis)
Lure of the Temptress (Revolution Software)
DreamWeb (Creative Reality)
The game data is downloaded from scummvm.org during the build (and cached like all other
downloads), installed to SYS:Games/<Name>, and registered in ScummVM's
configuration with complete launcher entries — the games appear in the ScummVM launcher
immediately, correctly named, with no Add Game step. Two automatic upgrades:
On images of 4 GB or larger, Beneath a Steel Sky and Flight of
the Amazon Queen install as their CD "talkie" releases with full
voice acting instead of the smaller floppy versions.
Lure of the Temptress ships in German, French, Italian, and Spanish:
if your locale selection includes one of these, that localized release is installed
(following the same first-locale rule as the keyboard layout).
ScummVM's 68060 build sets the hardware envelope: on PiStorm it is always
available (Emu68 presents a 68060); on Classic Amiga it requires a 68060
accelerator (the packages are hidden otherwise); on UAE and Amiberry the
companion configs request a 68060 automatically — enable RTG, since the
interpreter opens on a Picasso96 screen; on MiSTer (a 68000 Minimig core)
it is not available.
The Image & Build card
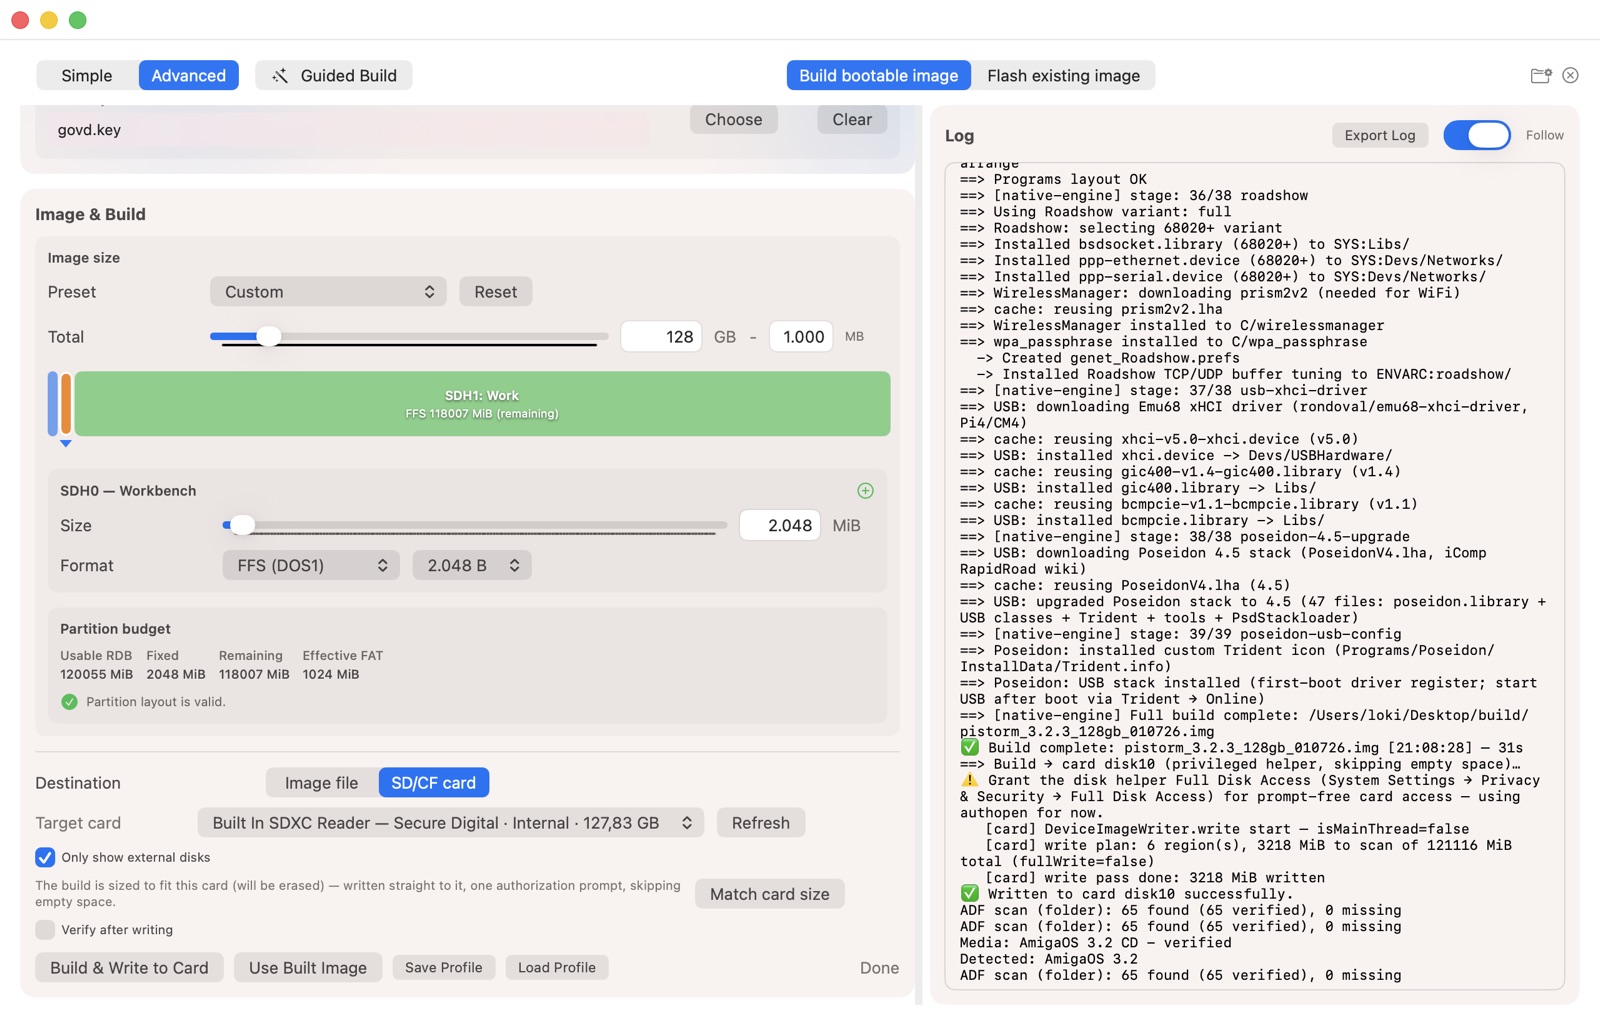
Choose the image size (presets or custom) and, in Advanced mode, the full partition layout with a live budget display.
Build destination: a file, or SD/CF card to build and write in one step (see chapter 7).
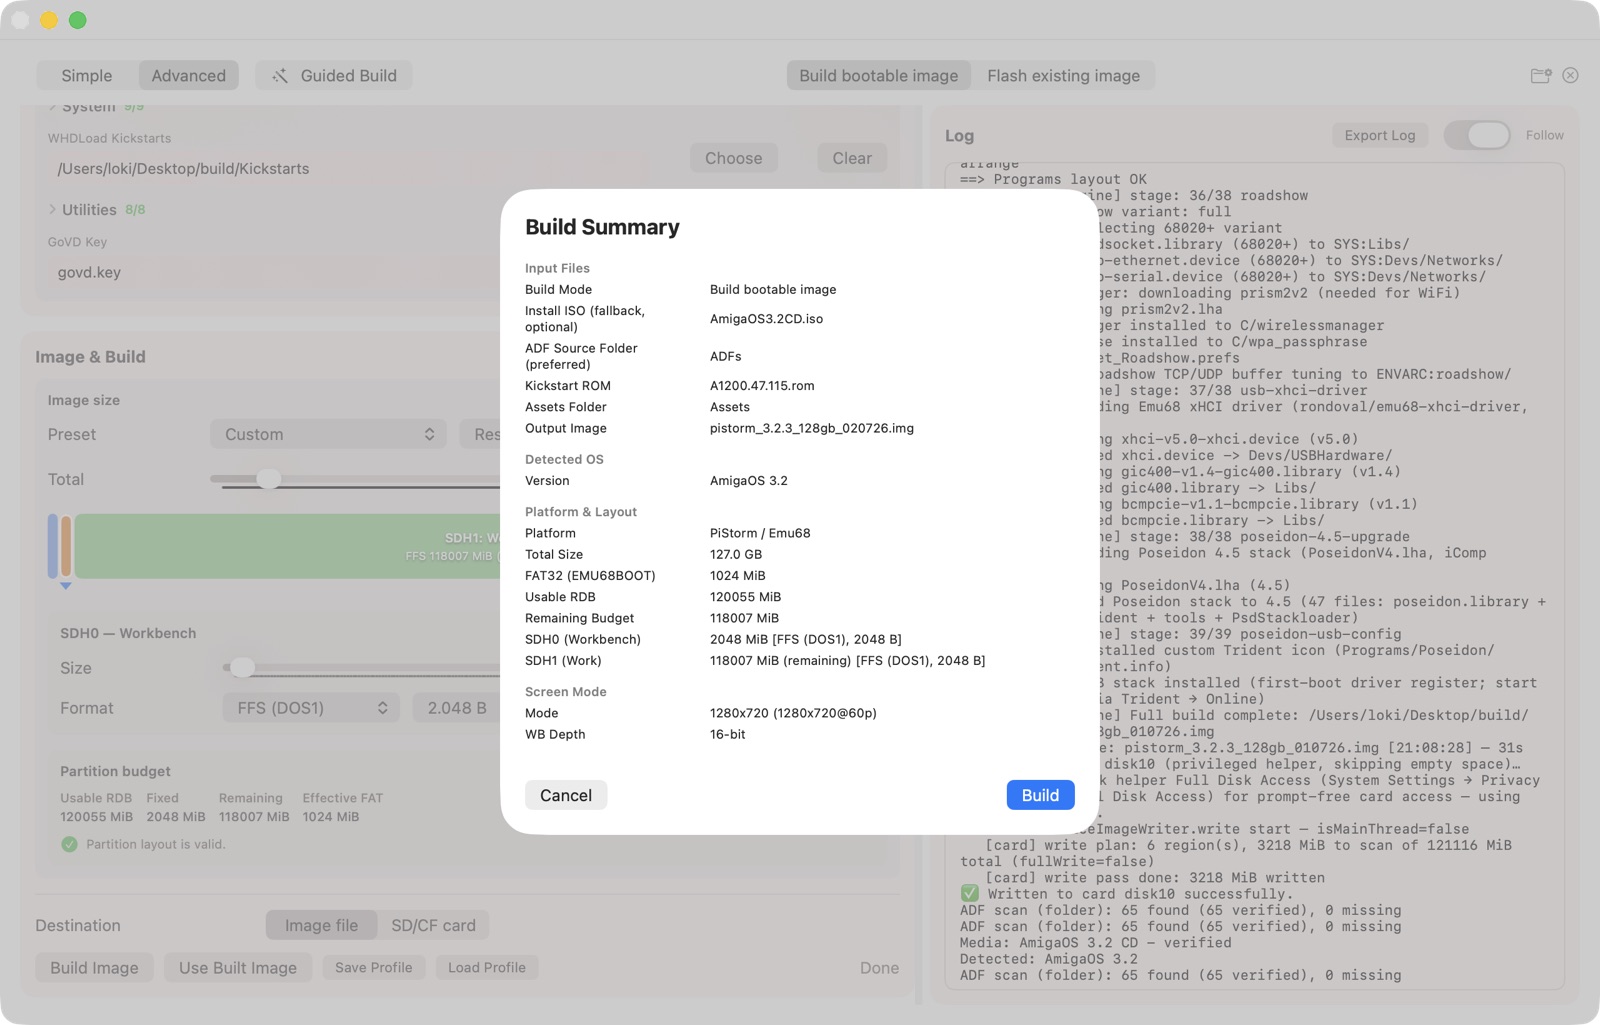
Before the build runs, the Build Summary lists your settings together with any warnings or errors — for example missing media, an RTG card without a screen mode, or a 3.2.x build without the Update disk (see the V47 rule). Blocking errors disable the build button and tell you exactly what to fix.
When the build finishes, macOS sends a notification — you can work in another app in the meantime. After a successful build, Use Built Image switches straight into the write flow.
The Build Summary — inputs, detected OS, layout, and screen mode, reviewed before anything is written.
Downloads and the build cache
Everything a build downloads is cached in
~/Library/Application Support/AmigaImager and reused on every later build.
This covers both the community packages you select and the engine's own dependencies
(the Emu68 boot bundle, Emu68-tools, network/RTG/USB drivers, fat95, the
CompactFlash driver, and so on). If a download can't reach the internet, the app
automatically falls back to the cached copy — so a flaky connection never breaks a
build, and repeat builds are noticeably faster.
Caching is managed in Settings → Packages → Build Download Cache:
Cache downloaded files (default on) — turn off to download fresh into a temporary folder every build.
Offline mode — never attempt downloads; use only cached files. If a required dependency isn't cached, the build stops with a clear message.
Re-download / Clear — refresh or empty either cache (packages and build dependencies are tracked separately).
To prepare a fully offline machine, run one normal build online first to warm the cache.
UserFiles — automatic file discovery
If you build often, UserFiles saves you from picking your ADFs, ROM,
and extras by hand every time. Turn it on in Settings → Build, point
the app at one base folder, and it fills in the media automatically
from a fixed folder layout.
The app seeds the structure for you (each folder holds a short "place files here" note):
AOS31, AOS3141, AOS32, AOS39 — the OS media and Kickstart ROM for that AmigaOS version (ADFs, or a CD ISO, plus a .rom).
Install — optional extras, matched by filename: your Picasso96 (iComp) archive, Roadshow, and the IBrowse/GoVD keys.
Kickstarts — extra Kickstart ROMs for WHDLoad.
Keeping several AmigaOS 3.2.x releases side by side. By default all
3.2.x point releases share the one AOS32 folder. If you own more than one
and want to keep them separate, create a per-version folder next to it — the app checks
the version folder first and falls back to AOS32:
3.2.1 → AOS321
3.2.2 → AOS322
3.2.2.1 → AOS3221
3.2.3 → AOS323
If you only have one 3.2.x set, just use AOS32 — nothing else to do. The
build log shows exactly which folder and files were discovered.
4. Platform guide: PiStorm / Emu68
PiStorm builds produce a complete SD card layout: a FAT32 boot partition with the Emu68
firmware, your Kickstart as kick.rom, and a generated
config.txt matched to your board — plus the Amiga RDB partitions with the
OS install. VideoCore RTG is always included; the machine boots straight into an RTG
Workbench.
The board selector
Different PiStorm boards need different Emu68 boot configurations. Pick yours in the
PiStorm section of the build screen:
A1200 — PiStorm32 / PiStorm32-lite (CM4). The default. Writes the official Emu68 configuration for the 32-bit board.
A600 — PiStorm16 (CM4). A600 only — no PiStorm16 exists for other machines. Writes the PiStorm16 configuration, including the bus-timing boot parameters the 16-bit board needs.
A500 / A2000 — PiStorm Classic (40-pin, e.g. Pi 3). Writes the classic-board configuration with the classic Emu68 kernel.
Selecting the right board matters: each one receives a hardware-proven configuration,
and a mismatched config can leave the machine stuck on the Emu68 splash screen — or not
booting at all. In particular, a 40-pin A500/A2000 PiStorm must use PiStorm
Classic, never PiStorm16. FrameThrower is its own option and works with any
board (it requires Emu68 1.1 or newer, which the build picks automatically).
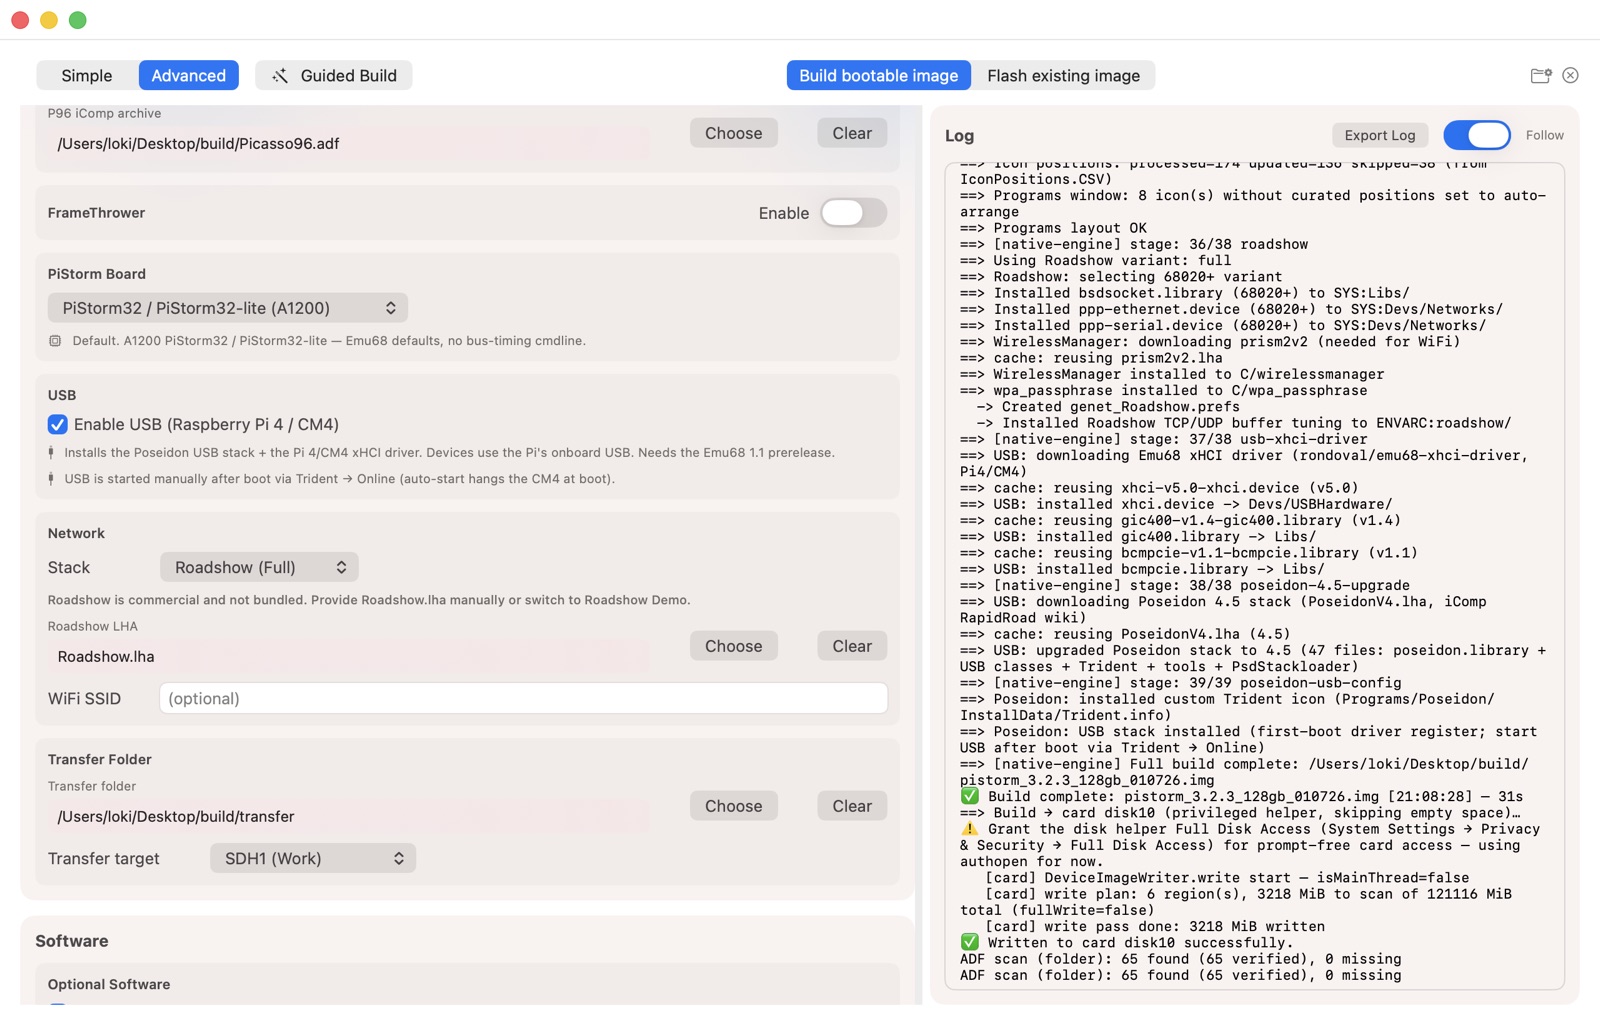
The PiStorm section: the 3-way board selector, and the USB toggle — note USB starts manually after boot via Trident → Online.
Emu68 firmware
The build downloads the current Emu68 release automatically (and caches it). The
PiStorm settings pane offers a prerelease opt-in for
Emu68 test builds, plus a boot-bundle source override for advanced setups. PiStorm16,
FrameThrower and USB builds need Emu68 1.1 and use it automatically — no opt-in
needed. Auto-mount EMU68BOOT: (default on) makes the FAT
boot partition appear as a drive on Workbench.
A newer Emu68 does not need a rebuild: Manage Amiga Software can update
Emu68 in place on an existing PiStorm image or SD card — see
Updating Emu68 on a PiStorm image or card in chapter 12.
FrameThrower
FrameThrower digitizes the Amiga's native video output and shows it over the Pi's HDMI —
one cable for both RTG and native screens. Enable it in the
FrameThrower section and choose mode (integer or smooth scaling),
size, offset, brightness, and contrast. Autostart brings the capture up at boot.
FrameThrower requires Emu68 1.1, which the build uses automatically.
RGB2RTG
RGB2RTG gets native screens onto HDMI with no extra hardware: an
unofficial Emu68 build that draws the Amiga's native display through the Pi itself, so
games, the early startup menu and the boot menu appear on the same monitor as the RTG
Workbench. It is your own download, chosen in Settings → PiStorm →
RGB2RTG, and it is given to individual systems on a card with a boot menu —
not to a single-system image. The card has to run Emu68 1.1, because RGB2RTG is built
on it. Its author calls it experimental. Setting it up, and what a system on RGB2RTG
gets, is described under RGB2RTG in chapter 8.
USB devices
On a Raspberry Pi 4 or CM4, the build can include a full USB host stack: the
Poseidon USB system plus the Emu68 xHCI controller driver. Enable it
in the USB section of the build screen. USB storage devices (sticks,
card readers) then work from Workbench.
Starting USB: after boot, open Trident — it sits right in the WBDock — and click Online. The controller and drivers are pre-configured on first boot; going online is the only manual step. (USB deliberately does not auto-start at boot: bringing the controller up during the boot sequence can hang the machine, so the app follows the same manual-start practice as the wider Emu68 community.)
The upstream xHCI driver is experimental — test with a USB stick you don't care about before trusting it with real data.
Wi-Fi and networking
PiStorm builds can include Roadshow networking with the Pi's own hardware: onboard
Wi-Fi (enter your network name and password at build time; connect
on the Amiga via the OnlineWifi tool) or wired
Ethernet on the Pi 4/CM4. The WBDock gets a matching go-online entry.
You do not have to type the Wi-Fi password: From this Mac fills in the
password this Mac already saved for that network (macOS asks for permission first),
and the password field supports Password AutoFill from the Passwords app. A password
used for a build is remembered for that network in the macOS Keychain and filled in
the next time you enter the same network name. The same goes for the amiagent and
Home Assistant tokens in Settings → Remote Access: they live in
the Keychain, never in the app's preferences or in a saved profile.
CompactFlash cards (PCMCIA)
A600/A1200-based PiStorm builds include the CFD133 compactflash.device
driver with an auto-mounting CF0 DOSDriver: insert a CF card in the PCMCIA
slot and it just appears. With no card present it is a silent no-op.
5. Platform guide: Classic Amiga
Classic builds produce a pure RDB image for CF/SD-to-IDE or SCSI solutions in real
Amigas — no PiStorm content. The full hardware matrix is supported natively:
Machines: A500, A600, A1200, A2000, A3000, A4000(T), CD32-based setups — the machine choice drives the right scsi.device modules, keymaps, and boot handling.
Accelerators: 68000 through 68060, including iComp ACA cards (with the correct MapROM handling) and TF cards. MMU libraries are installed and configured when the CPU has an MMU.
RTG cards: P-Vision, ZZ9000, VA2000, Vampire SAGA, Picasso, CyberVision, and more. Supply your iComp Picasso96 archive for the broadest compatibility; the selected screen mode is seeded so the card comes up in RTG on first boot.
Network cards: PCMCIA (3Com, NE2000…), Zorro (Ariadne, X-Surf, ZZ9000Net…), clockport (PicoWiFy), and the A314. A314 requires Roadshow — the Build Summary flags the mismatch. A1200 PCMCIA builds get CardPatch automatically.
USB host cards: Poseidon-based cards (Subway, Highway, Algor) with the free driver set, or supply the driver disk/archive for licensed cards (e.g. FreeWay/Triton). On Classic there is a one-time setup after the first boot: open Trident, add your controller on the Hardware page (New → pick your .device from DEVS:USBHardware, unit 0), click Online, then Save. From then on it's simply Trident → Online per session. (The build deliberately does not probe USB controllers during boot — a failed probe can freeze some machines, so this one manual step buys a reliable first boot on every setup.)
Controller compatibility: MaxTransfer and Mask are settable under Settings → Classic for picky IDE/SCSI controllers; the defaults are safe for common setups.
Classic Amiga: machine, accelerator, RTG card, network card, and USB card selectors on the Input card.
The V47 rule: 3.1 ROMs and the Update disk
AmigaOS 3.2 on a hard drive normally requires a V47 (3.2) Kickstart ROM.
Machines with an older 3.1 (V40) or 3.1.4 ROM can still boot it — the
hard-drive startup performs a soft-kick (LoadModule … ROMUPDATE)
that loads the V47 ROM modules from disk at boot. That soft-kick startup script ships
only on the 3.2.x Update disk (Update3.2.3.adf and
friends).
In practice:
If your Amiga has a physical V47 ROM, any 3.2 build boots.
If it has a 3.1/3.1.4 ROM, make sure your ADF sources include the Update disk of a 3.2.x point release. Without it the image drops to a shell saying "This disk must be booted from Kickstart ROM 3.2 (V47)".
The app checks this before building: selecting 3.2.2 or later without an Update disk is a blocking error in the Build Summary; base 3.2/3.2.1 shows a warning.
PiStorm builds are not affected — Emu68 always provides a V47 ROM.
CompactFlash cards (PCMCIA)
A600 and A1200 builds include the CFD133 compactflash.device driver with an
auto-mounting CF0 DOSDriver — a CF card in the PCMCIA slot just works.
Vampire V4 / Apollo 68080
The Vampire is handled as a Classic accelerator, not a separate platform.
Selection recipe (example: an Icedrake in an A1200): machine A1200, accelerator
Apollo 68080 / Vampire, RTG card Vampire SAGA, network card
Apollo V4Net (V4-family boards) or V2ExpEth (V2 cards) — the
network choice also tells the build which board generation you have. Support is hardware-validated on an Icedrake A1200. Everything
is sourced from the official Apollo SAGADriver.lha, so a matching set of drivers
and tools is installed automatically:
68080 CPU handling: the build deliberately ships no68040.library, 68060.library, or MMU libraries. On a 68080 those make SetPatch run the CPU/MMU setup for the wrong class and guru the machine on boot (#80000008), so they are stripped — you don't need to clean anything up by hand.
VampireSAGA RTG: pick a screen mode as usual. Hardware-measured resolutions (for example 1280×720) are seeded so the Vampire comes up in RTG on first boot. An un-measured resolution boots to the native screen and you pick the RTG mode once in ScreenMode prefs — the choice then persists.
Networking: the onboard NIC driver is installed with Roadshow — v4net.device on V4 boards, v2expeth.device on V2 / A2000 boards. Board generation is inferred from your selections.
SD card: a FAT-formatted card in the board's (micro)SD slot auto-mounts as SD0: (sagasd.device + fat95) — handy for moving files from the Mac. The second slot is available as SD1: via Storage/DOSDrivers. Toggle in Settings → Classic.
FreeWay CP USB: if you use the FreeWay clockport USB card, its own freewaycpusb.device is installed. It is not Subway-compatible, so a generic Poseidon/Subway driver leaves it empty — Amiga Imager ships the correct one. Remember the one-time Trident setup described above (add the controller → Online → Save); on the Vampire especially, probing USB hardware during boot is exactly the kind of thing that can wedge a first boot, so the build leaves it to you.
The ROM caveat — read this before you build. Vampire boards usually ship with
the ApolloOS (AROS) ROM, and the V47 soft-kick trick described in the V47 rule
above does not work on it. So the build stages the Apollo tools —
C:ApolloMap, C:ApolloFlash, C:ApolloControl and your
Kickstart at SYS:Apollo/kick.rom — for you to map or flash a real 3.2 (V47) ROM yourself:
run ApolloMap SYS:Apollo/kick.rom to map it temporarily (lost on power-off), or
ApolloFlash SYS:Apollo/kick.rom to flash it permanently — for a dedicated AmigaOS
machine, flashing is the comfortable choice. Never interrupt ApolloFlash: a
broken flash needs a USB-Blaster recovery. There is deliberately no automatic boot
hook: ApolloMap reboots after mapping, which would loop forever if it ran from the
startup. Run it once by hand, then your 3.2 builds boot normally.
6. Platform guide: Emulators
The Emulators target builds a pure-RDB .hdf with no PiStorm boot content.
Pick the profile — MiSTer (Minimig), UAE, or
Amiberry — next to the platform selector.
MiSTer
The MiSTer profile builds for one of two cores, chosen under
Settings → Emulators → MiSTer Core: the official
Minimig (the default) or BigMig.
Minimig
Optional RTG uses the official MiSTer RTG path.
Networking uses the core's emulated A2065 Ethernet card by default (Minimig 20260823 or newer) and is up at boot. In the MiSTer OSD set System → Ethernet and choose Save configuration, or a reload switches it off again.
For older Minimig releases, switch to PPP over serial in Settings → Emulators: set the core to UART Mode = PPP, Baud = 115200 (8N1, RTS/CTS on) and bring the link up from the Ethernet dock icon. Before launching the core, make sure the network icon is showing in the MiSTer Menu core — otherwise PPP never hands out an address. If it doesn't connect, check RAM:Roadshow-PPP.log (and see Troubleshooting).
Extras (Settings → Emulators): the official SHARE: shared folder (Linux side: /media/fat/Amiga/shared) and mouse wheel support.
BigMig
BigMig is a separate MiSTer core: the Minimig chipset driven by the Emu68-A9 JIT. Select 68040 as the CPU in its OSD.
Its RTG card is a ZZ9000, not the MiSTer RTG card. With RTG on, Amiga Imager installs BigMig's own drivers from its guest disk: ZZ9000.card, bigmigAHI and the MHI library. In the OSD, System → Zorro Boards → ZZ9000 RTG must be ON.
Its network is the ZZ9000's network function with BigMig's ZZ9000Net.device: switch ZZ9000 Network ON in the same OSD page. The Amiga takes an address by DHCP at boot.
BigMig's network is wired only. The core connects the Amiga to the MiSTer's Ethernet port, never to its WiFi: on a MiSTer without a cable, Workbench shows 0.0.0.0 on the ZZ9000Net interface. Plug in a cable or a USB Ethernet adapter, or use the workaround below.
BigMig on a MiSTer with WiFi only
A WiFi connection can only carry the MiSTer's own address, so the Amiga cannot simply be
bridged onto it. The script bigmig-wifi.sh routes it instead — Amiga Imager writes
it next to the image on every BigMig build with networking: it puts a virtual eth0 in place of the real port, passes the
Amiga's traffic through the MiSTer onto the WiFi, and gives the Amiga one fixed address in your
LAN by DHCP. It writes nothing to the SD card, so a MiSTer restart undoes it — and loading a
core restarts the MiSTer, so run it again after every restart.
Copy bigmig-wifi.sh from next to the image to /media/fat/Scripts/ on the MiSTer's SD card.
Load the BigMig core, then log in to the MiSTer over ssh (user root, password 1 unless you changed it) and run sh /media/fat/Scripts/bigmig-wifi.sh start
The Amiga gets the address ending in .250 in your LAN. If that one is taken, or lies
inside your router's DHCP range, give another: … start 192.168.1.240.
In the BigMig OSD switch ZZ9000 Network OFF, then ON: BigMig attaches to
eth0 when the row switches on, and has to find the new one.
Reset the Amiga, or in an Amiga Shell type ConfigureNetInterface ZZ9000Net CONFIGURE=DHCP ShowNetStatus then shows the address.
… bigmig-wifi.sh status shows whether it is running and the last DHCP replies;
… bigmig-wifi.sh stop puts the real Ethernet port back. Don't run it with a cable
plugged in — then BigMig reaches the LAN directly, and the script refuses to start.
UAE / Amiberry
Optional RTG uses uaegfx (Picasso96).
Two companion configs are written next to the image, describing the same machine in each emulator's own dialect: .uae for WinUAE/Amiberry and .fs-uae for FS-UAE. Both ship with an empty Kickstart path by design — set kickstart_rom_file (.uae) or kickstart_file (.fs-uae) to a Kickstart 3.2 (47.x) ROM before launching. AmigaOS 3.2 needs a 47.x ROM; a 3.1/40.x ROM will not boot it reliably.
The emulated CPU is selectable (68020 default, 68030, 68040, 68060) and is written into both configs. A 68040/68060 choice relies on the CPU libraries from MMULibs.adf, which SetPatch loads at boot — keep that disk in your ADF folder; the build warns if the libraries are missing. Only the library matching the chosen CPU is installed: the OS 3.2 CPU libraries refuse the wrong processor, so a 68060 image carrying 68040.library would alert whenever something opens it. Installing ScummVM raises the CPU to a 68060 automatically.
There is no Amiga-side network stack on these profiles — networking goes through the emulator host (bsdsocket, enabled in both configs).
FS-UAE users: launch with the .fs-uae file. FS-UAE reads
none of the .uae keys — an HDF attached to a hand-rolled FS-UAE config
gets no RTG board, no bsdsocket networking, and only 8 MB of Zorro II Fast
RAM. The generated .fs-uae file configures all of this (including the
256 MB of Zorro III Fast RAM that memory-hungry AmiSSL 5.x needs). If
you build your own config instead, carry at least
zorro_iii_memory = 262144
over from it — without that, programs fail in ways that point somewhere else entirely
(see troubleshooting).
7. Writing images to SD and CF cards
There are two ways to get an image onto a card:
Build straight to a card: on the build screen, set Build destination to SD/CF card and pick the target. The build button becomes Build & Write to Card and the finished image is written immediately.
Flash existing image: the second workflow tab writes any previously built image — choose the file, choose the disk, click Write to Disk.
Writing erases the card, so the app first shows a confirmation naming
the exact target — card name, size, and /dev node. Read it, then click
Erase and Write (the confirmation can be disabled in
Settings → Storage → Card Writing). The write skips empty space, so
only actual content is transferred, and verifies the result afterwards; a progress bar
under the toolbar shows both passes.
Build straight to a card: the build is sized to fit the selected card and written directly to it, skipping empty space.
Prompt-free card access
Card access goes through the signed Amiga Imager Disk Helper, so the
authorization is branded rather than a generic system prompt — and silent once set up.
One-time setup:
If prompted, enable Amiga Imager under System Settings → General → Login Items & Extensions (Allow in the Background).
Under System Settings → Privacy & Security → Full Disk Access, add and enable Amiga Imager Disk Helper (inside the app bundle at Contents/MacOS/AmigaImagerDiskHelper). macOS protects removable media, so this step is required for silent access.
Until the helper is approved, the app falls back to the standard macOS authorization
prompt — card access always works either way.
Saving a card as an image
The other direction: File → Save Card as Image… (also a button in the
Amiga File Manager's toolbar) reads an SD or CF card, or a hard disk in a USB
adapter, into a file on the Mac. The card is only read, never
written. Internal Mac disks are not offered.
Pick the card and click Continue. macOS asks for permission
unless the Disk Helper is set up (above).
Choose what to save:
Whole card (.img) — every sector, exactly as on the card. This
is a backup: write it back with Flash existing image and you
have the same card again. It works for any card, Amiga or not.
Amiga partitions (.hdf) — the Amiga part as an RDB hardfile,
which UAE, FS-UAE, Amiberry and MiSTer mount directly. On a classic CF card or
hard disk that is the whole disk; on a PiStorm card the FAT boot partition
(EMU68BOOT) is left out, so the card's systems can run in an emulator. A card
with two Amiga partition tables, like AmiKit's, offers one HDF for each.
Click Save…, pick a place, and wait for the progress bar. Cancel
stops the read and removes the unfinished file.
Reading takes time, not space: a whole 256 GB card through a typical USB card reader
takes about an hour, an HDF only as long as its partitions. Empty areas are skipped,
so on the Mac the file takes only the space the card's data fills. Copied to a USB
stick or an exFAT disk, it grows to its full size.
Disks of an Amiga on the network
Both Save Card as Image and Add System from Card
can read the disk of an Amiga that is running on your network, without taking its
card or drive out. Switch the source from Card or disk to
Amiga on the network, choose the machine and the disk.
The machines are the ones in the Amiga Fleet console
(File → Amiga Fleet…), with their address and token. They need
amiagent 0.14 or newer; on the Amiga,
amipkg upgrade amiagent brings it.
The list shows each disk with the drives the Amiga mounts from it
(scsi.device 0 · DH0, DH1). Floppies are not offered.
The disk is only read. For an import, only the partition tables
come over first; the partitions you tick follow, and are measured on the Mac.
The Amiga keeps running while it is read. Leave it idle until
the progress bar is done: whatever it writes in the meantime may end up only half
in the image.
Speed depends on the Amiga's network: under 1 MB/s on an A4000 with a Zorro
network card, more on a PiStorm. A single system partition is much quicker than the
whole disk. The progress bar shows how much has come over, the current speed and
roughly how long the rest will take.
8. Several systems on one card
One card can carry several complete systems — your own Workbench, Coffin, AGS, a
games collection — and a boot menu asks at power-on which one to
start. Amiga Imager builds such a card from images you already have: it copies their
partitions onto the new card and adds the menu. The source images are only read,
never changed.
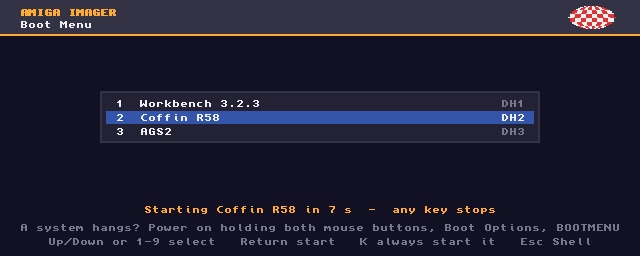
The boot menu: the system started last is highlighted and starts by itself after ten seconds unless you touch a key.
Setting it up
In Settings → Build, switch on Show blank-image mode
and Boot manager for images with several systems — and, for a
PiStorm on HDMI, PiStorm: show the boot menu over HDMI.
On the Blank image tab, choose your AmigaOS ADF folder or ISO.
The boot menu lives on a small FFS partition of its own and takes its commands from
the AmigaOS media, so a card with a boot menu needs them even when every other
partition is PFS3.
Choose Build blank image and your platform. On PiStorm, select
your Kickstart ROM as usual — it is the card's ROM, and every system starts with it
unless you give that system its own (see Kickstart per system below).
In the partition editor, click the drive-with-plus button next to a partition
and choose From Image… for an
.hdf, .img or .hda — or
From Card or Disk… for a card in the reader (see
Systems straight from a card below). A sheet lists the image's
partitions with their filesystem, size and content; tick the ones you want. Repeat
for every image.
Each imported partition shows From image as its source. The
Offer this partition in the boot menu switch decides which systems
the menu lists. The entry is called after its image file; type a
Menu title to change that. The volume name stays as it is,
because systems refer to it.
The image grows by itself when the imported partitions need more room.
Fit Image to Partitions (next to the image size) shrinks it again to
exactly what the layout needs.
Build — to a file or straight to the card (chapter 7).
A new system plus the ones you have
A normal build can carry other systems too: the card gets the AmigaOS this build
installs, the systems you add, and the boot menu in front of them.
In Settings → Build, switch on Boot manager for images
with several systems. Blank-image mode is not needed for this.
Set up the build as usual: platform, OS media, software, networking.
Under Image & Build, Other systems on this
image has a button Add System from Image…. Choose an
image and tick its partitions, the same sheet as above. Repeat for every system.
The list shows each added system, with a button to take it off again.
The system this build installs is the menu's first entry and is started when
nobody picks one. Its partitions keep their place in front; the added systems go
after it, before a partition that uses the remaining space.
Titles, a system's own Kickstart and the other menu choices are in the
partition editor (Advanced mode), per partition, as above.
Without an added system there is no boot menu, and the build is the same as
without the setting. The transfer folder and the WHDLoad games always go onto
the build's own partitions, never into an added system. On first boot the new
system restarts once to set the language; it then comes back through the menu,
which starts it again by itself after ten seconds.
Systems straight from a card
A system does not have to be an image file. Add System from Card…
(next to Add System from Image…; in the partition editor
From Card or Disk…) reads the Amiga partitions of an SD or CF card,
or of a hard disk in a USB adapter: your old PiStorm card, a CF card out of an A1200,
a drive that has been in an Amiga for thirty years.
Put the card in the reader, click Add System from Card…, pick
it and click Read Partitions. The card is opened
read-only; internal Mac disks are not offered. The disk of an
Amiga on the network works the same way — see
Disks of an Amiga on the network.
The usual sheet lists its partitions. Tick the ones you want and click
Read and Add….
Choose where the partitions are saved. Amiga Imager first copies them into an
image file, and the build takes them from there — so you can take the old card out
and put the new one in before Build & Write to Card, with a
single card reader. A saved profile names that file, so it still works next time.
Only the chosen partitions are read, and empty areas are skipped: the file is as big
as the card on paper, but takes only the space those partitions fill. To keep a copy
of the whole card, use Save Card as Image.
What is copied
FFS, OFS and PFS3 partitions can be read. SFS partitions cannot be read
yet; the sheet shows them greyed out.
An image of a PiStorm card can hold more than one Amiga partition table — AmiKit's
card keeps AK0 and AK1 in two separate Amiga partitions. All of them are offered,
and the sheet says which one each partition comes from
(Amiga partition 2 of the image).
Every file keeps its protection bits, comment and date. Hidden partitions — on
the disk but not in its partition list, like Coffin's games partition — are offered
too.
Names longer than 30 characters need long-name FFS. An imported FFS partition
that has such names is formatted as DOS\7 automatically, and the editor
says so.
Soft links and links to directories are not copied. Anything that was left out
appears in the Warnings list above the log after the build.
Partitions that belong together
Most images expect their own drive names: a system on DH0: whose games
live on DH1:. Partitions imported from one image therefore form a group.
On the card they wait under neutral names (MBA0, MBA1 …) and
are not mounted; when you pick that system, they get their own names back for as
long as it runs. The editor shows both names for each such row — for example
On the card MBA1, not mounted; DH1 while Coffin runs. Systems therefore
never see each other's partitions and cannot mix.
A system that comes as several image files — System One with its
games in a second file, or AmiKit's AK0 and AK1 saved separately — is put together with
Belongs to in the partition editor: choose the system for each extra
partition, and it joins that system's group under its own drive name. A further
partition from a system's own image already belongs to that system, and the picker
shows it preselected; only a partition whose image has no system on the menu can be
left at Every system (shared), and is then mounted in all of them.
Partitions that belong to no system — a data partition you added yourself — are
mounted in every system. Such a partition never takes a volume name one of the systems
uses: a second Work becomes Work2 on the card. On the
desktop, the card's own volumes sit in a second column — BootMenu (a hard
drive with the boing ball) at the top, then the shared partitions — and
EMU68BOOT keeps its usual place; each system keeps its own drive icons.
Kickstart per system (PiStorm)
A PiStorm card starts with the Kickstart ROM you chose for the card. A system that
needs another one — Coffin, for example, brings its own 3.9-based ROM — gets it under
Kickstart for this system in the partition editor. The build puts
every such ROM onto EMU68BOOT.
Emu68 loads the ROM only when the Raspberry Pi starts. When you choose a system whose
ROM differs from the one running, the menu switches the card over and asks you to
press Ctrl-Amiga-Amiga once: a keyboard reset restarts the Pi, and
the system comes up with its own ROM. Switching off and on works too. When that
system hands the card back to the menu, the card returns to its own ROM — so the
boot menu always comes up in the environment it was built for, and a system with
its own ROM asks for that keyboard reset every time you start it. Systems that run
on the card's own ROM switch without that step. For Coffin r65, take the ROM that
ships inside the image (DEVS:Kickstarts/coffin.rom) — an older Coffin
ROM does not fit r65.
A system made for an older Kickstart may not start on a newer one: Workbench 3.1 has
no icon.library on disk because Kickstart 3.1 carried it in ROM, so on a
3.2 ROM it stops at a requester. The import sheet and the editor warn about such a
system — give it its own ROM, or update it first.
Emu68
A PiStorm card has one Emu68 for all its systems, and a system's drivers (Ethernet,
VideoCore) are made for the Emu68 it was built with. When an imported system was built
by Amiga Imager for Emu68 1.1, the card gets Emu68 1.1, and the build log says why.
Otherwise the card stays on the stable 1.0 line.
Distributions made for Emu68 1.0 can stumble on a 1.1 card. Coffin r65 runs there with
the adjustments below; AmiKit (up to 12.8.3) does not. So each system can have
its own Emu68: when the card runs 1.1 and a system needs 1.0, the
build puts Emu68 1.0.7 into a folder of its own on EMU68BOOT
(Emu68-v1.0.7), and the boot menu switches between the two the way it
switches Kickstarts — one Ctrl-Amiga-Amiga. Amiga Imager recognises AmiKit and the
systems it built itself; for anything else, set Emu68 in the
partition editor (Automatic, 1.0 or 1.1). A card whose hardware needs 1.1
(PiStorm16, FrameThrower, USB) cannot run a 1.0 system; the build log says so.
RGB2RTG
RGB2RTG is an unofficial Emu68 build that draws the Amiga's native screen on
the Pi's HDMI output, so games, the early startup menu and the boot menu appear on the
same monitor as the RTG Workbench — no camera-port hardware needed. It is not bundled
with Amiga Imager: download it from its author and choose the .zip,
.lha or unpacked folder in Settings → PiStorm → RGB2RTG
(a .7z has to be unpacked in the Finder first). Version 0.78 is
recognised; its kernels for Pi 3 and Pi 4 both go on the card, and the Pi picks its own.
No system uses it unless you say so: choose RGB2RTG as a system's
Emu68 in the partition editor. Switching to it works like a Kickstart
switch — the menu asks for Ctrl-Amiga-Amiga once. RGB2RTG is built on Emu68 1.1, so
the card must run 1.1 too; on a 1.0 card the build log warns, and the system starts
with the card's Emu68. A system on RGB2RTG also gets
RGB2RTG's own programs: C:rgb2rtg, RGB2RTG-SoundMonitor
and RGB2RTG-Native in SYS:Utilities, the HDMI audio
driver for AHI (when the system has AHI), and a line in S:User-Startup
that applies your RGB2RTG settings at every start. For RGB2RTG's entries in the
Directory Opus menu, run C:rgb2rtg MENU once in a Shell. RGB2RTG's own
installer is not needed — and should not be run on a card with a boot menu, because
it rewrites config.txt, which belongs to the boot menu there.
Its author calls it experimental: it is built for the Amiga 1200 and optimised for
CaffeineOS, and some demos and games come out in the wrong colours or do not run.
Adjusting imported systems
Some systems need small changes to run on the new card. When the import finds one, the
partition editor shows Adjust for this card with a switch for each
change. They are on by default; every file that is changed keeps its original beside
it (.orig, .old), and the build log lists each one.
Set up its graphics for the PiStorm — for systems with their own
PiStorm setup. Coffin r65 takes the PiStorm for a Vampire, misses the PiStorm under
Emu68 1.1, and brings a VideoCore driver that crashes there, so it stays on PAL with
a "Software Failure". The adjustment corrects its board check and detection, swaps
in the VideoCore driver that matches the card's Emu68, and adds the tool type its
Picasso96 settings expect. Coffin then starts on HDMI.
Use your full Roadshow — for systems that run the Roadshow demo,
which stops the network after a few minutes. When your Roadshow archive is set in
Settings, its full bsdsocket.library goes in (for Coffin as
bsdsocket.library_full, which Coffin picks up itself).
Exchange partition (PiStorm)
Settings → PiStorm → Exchange Partition adds a FAT32 partition called
EXCHANGE at the end of the card (4 GB unless you choose another size).
Put the card in a Mac or PC and it shows up as an ordinary drive; on the Amiga it
appears as EXCHANGE: on the Workbench — for music, downloads or WHDLoad
archives. On a card with several systems, every system that has
fat95 mounts it. Its size comes off the Amiga partitions; the card size
stays. It works for single-system PiStorm images too.
Using the menu
Up/Down or 1–9 select, Return
starts; one click with the mouse picks and starts; a joystick in port
2 selects with up/down and starts with fire.
The system started last — on a new card, the first one in the menu — is
highlighted and starts by itself after ten seconds; any key stops the countdown.
K starts the highlighted system and keeps it: from then
on the card starts that system directly, without the menu.
Esc leaves a Shell on the menu partition.
R restarts into the rescue shell, when it is switched on (see
below).
From a running system, double-click Boot Menu on the
BootMenu disk to choose the system for the next start — this is also
how you get the menu back after K. Choosing without K returns the
card to showing the menu at every start.
The menu over HDMI (PiStorm)
At power-on the menu opens on the Amiga's own video output. If your PiStorm is
connected only by HDMI, switch on PiStorm: show the boot
menu over HDMI in Settings → Build. The menu partition
then gets a small Picasso96 setup with VideoCore.card, and the menu opens on HDMI.
This needs your AmigaOS 3.2 ADF folder (for icon.library and
iffparse.library) and downloads Picasso96 and Emu68-tools — or uses your
iComp Picasso96 archive, if you chose one. Power-on takes a few seconds longer.
Without that option the countdown still runs on HDMI, unseen: after ten seconds the
system chosen last starts and brings up its own RTG display. Either way, the
Boot Menu icon opens the menu on the same display as the Workbench.
Changing the menu on the Amiga: Boot Menu Prefs
Next to Boot Menu, the BootMenu disk carries
Boot Menu Prefs. Double-click it in any running system to:
rename an entry (Title) and change the order
(Up/Down);
take a system out of the menu or back in (In the menu) — it
stays on the card;
set the Countdown (0 = wait for a choice) and which system is
Preselected — a fixed one, or the one started last;
choose the Screen: the Amiga's video output or HDMI (only when
the card was built with the HDMI option);
switch the menu off: At power-on → Always start … starts that
system every time, as if it had been chosen with K.
Show the boot menu brings the menu back.
on a card that switches Kickstarts, give a system its own
ROM (a file on EMU68BOOT) and its own
Emu68 profile. Empty means the card's own.
Changes take effect at the next start.
Which partition belongs to which system
Page → Partitions lists every partition of the card with its size
and what it is for: the boot menu's own, a system's (a * marks the one
that system starts from), or - for one that belongs to nobody — a
shared data partition, or one that is still free.
Part of moves a partition to another system, or sets it free.
A system whose last partition is taken away disappears from the menu.
Runs as is the name the partition carries while that system
runs — systems imported from another image expect their own
DH0, DH1 …
Starts the system picks which of a system's partitions it
boots from.
New system from it makes a free partition a menu entry of its
own. Give it a title on the Systems page afterwards — and, if it
needs one, its own ROM.
Also in and Mounted there too mount one
partition in a second system as well, without taking it away from the one it
belongs to: pick the other system and tick the box. The list then marks it with a
+ in front of the system name. Use it for a data partition that every system should see,
or to copy one system's data into another's from the running Workbench. In the
other system the partition keeps the name it has on the card, and only the system
it belongs to can start from it.
Saving here also puts the card itself back in order, so a partition that has just
become a system's cannot boot past the menu. Creating, resizing or filling
partitions is not done here — that stays Amiga Imager's (or HDToolBox's) work.
How a system gets back to the menu
Picking a system makes its partition the one that boots and restarts the Amiga.
Amiga Imager adds one line, AmiBootLoader RESET, to each system's
S:User-Startup (or before LoadWB when there is none); it
puts the card back so that the next power-on shows the menu again.
If a system hangs before it gets that far, the next start would run it
again. To get out: switch the Amiga on while holding both mouse
buttons, choose Boot Options, select
BOOTMENU as the boot partition, and boot. The menu appears and you
can choose another system. The menu itself shows this hint at the bottom of the
screen.
Each menu run is written to BootMenu:S/AmiBootLoader.log, with the
Kickstart that was running — the first place to look when a choice does not do what
you expected.
The rescue shell
Switch on Boot menu: rescue shell in Settings → Build
and the menu offers R: the Amiga restarts with every partition of the
card mounted under its card name (MBA0, MBB0 …) and opens a
Shell on the menu partition, with the usual commands from your AmigaOS 3.2 ADFs and a
short help text. That is the way into a system that no longer starts — for example
Copy MBB0:S/Startup-Sequence.orig MBB0:S/Startup-Sequence undoes an
adjustment. The next Ctrl-Amiga-Amiga shows the menu again. The rescue shell uses the
Amiga's own video output.
9. The Amiga File Manager
The Amiga File Manager is a built-in window for browsing and editing
Amiga disks without booting an Amiga. It reads and writes real Amiga filesystems
directly — drop files onto an image, pull a save-game off an SD card, or peek inside
an archive, all from macOS. Open it with the Amiga File Manager button
in the main window's top bar or with Shift-Cmd-M.
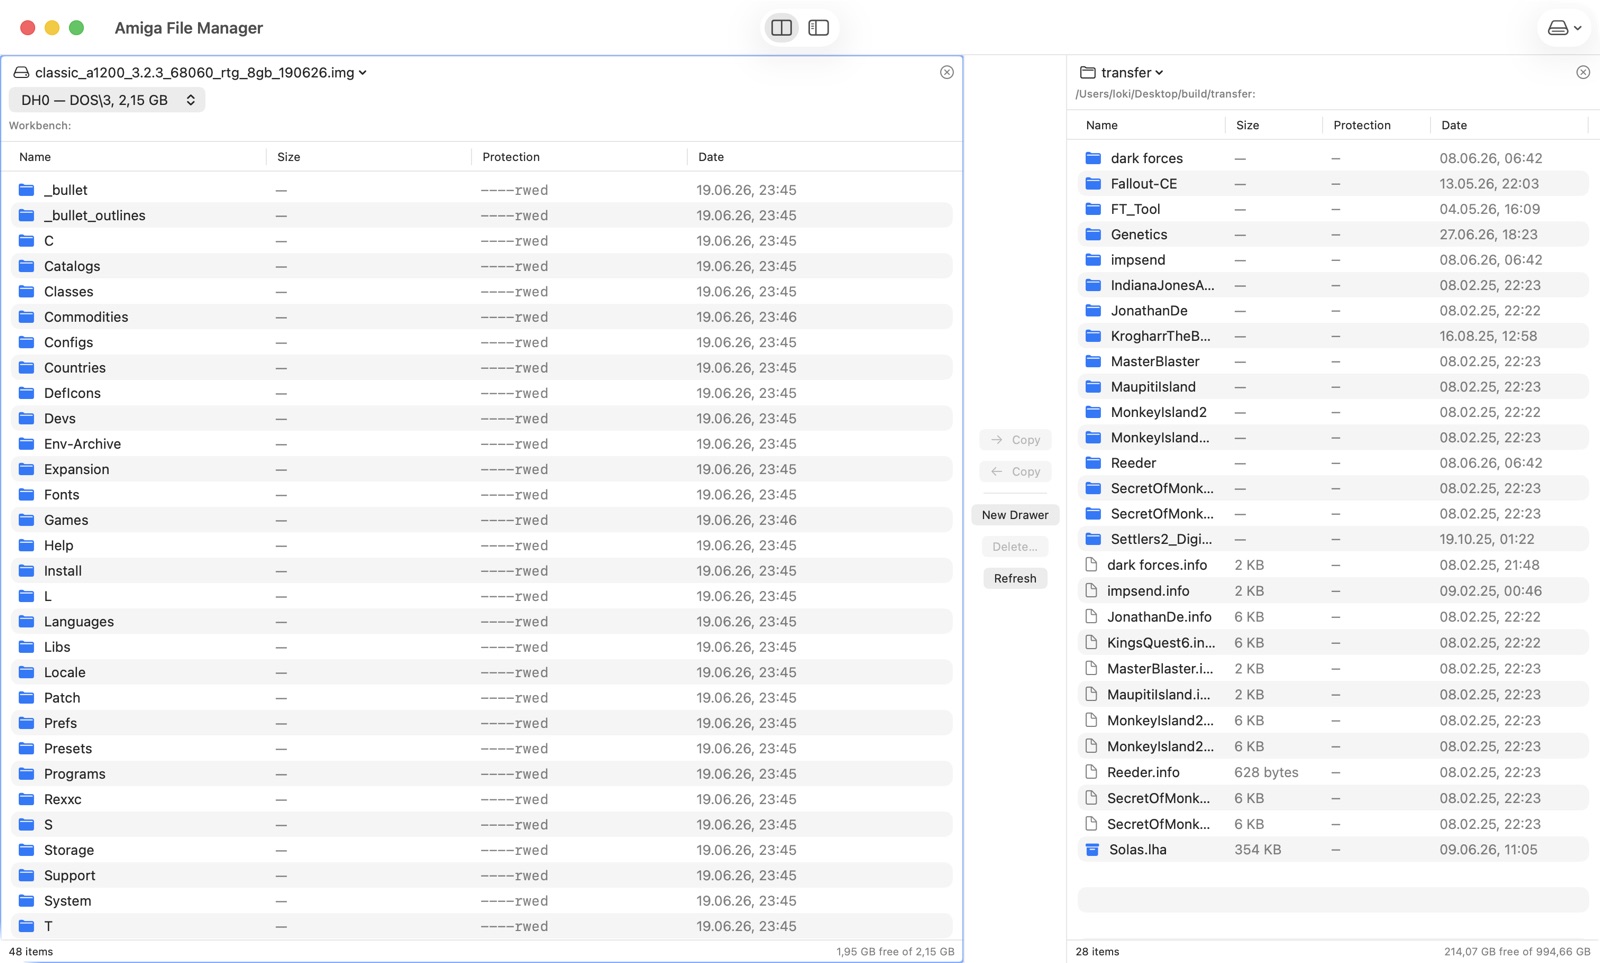
The File Manager in dual-pane view: a mounted Amiga volume on the left, a Mac folder on the right — copy either way.
What you can open
Hard-disk images (.hdf, .img) — RDB partitions formatted as FFS or PFS3, and the FAT32 boot partition of a PiStorm image.
Floppy images (.adf) — OFS and FFS.
Physical SD/CF media — a card in a reader, browsed straight from the device.
Folders on your Mac — for copying between host folders and Amiga volumes.
LHA / LZH archives (.lha, .lzh) — browsed read-only, like a drawer.
Two views
A toolbar toggle switches between dual pane (two side-by-side panes,
Directory Opus style — ideal for copying between two disks) and
browser (a single Finder-like view with a sidebar of everything open).
Your choice is remembered. In either view, pick a source, then a
partition, then navigate; a breadcrumb shows where you are.
Working with files
Copy out — drag files or whole drawers from an Amiga volume to the Finder or to a host-folder source.
Copy in — drag files from the Finder onto an Amiga volume or folder.
Move — dragging within the same volume moves; dragging to a different volume copies.
New drawer and Delete — create folders and remove items (recursive for non-empty drawers).
Double-click an .lha/.lzh to descend into it like a drawer and drag files out (archives are read-only).
There is no rename yet.
Physical cards
Physical media is treated carefully: a card always opens read-only first;
writing is an explicit second step. While a build is running or a card is being written,
the File Manager refuses to open that image or disk. Access uses the same silent Disk
Helper as card writing (chapter 7). To keep a copy of a card as a
file, or to turn it into an HDF for an emulator, use the toolbar's
Save Card as Image (chapter 7).
10. Real floppy drives
With a supported USB floppy controller and a 3.5" drive, the File Manager reads and
writes real Amiga floppies — no separate tools. Use the Floppy Drive menu in
the File Manager toolbar.
Greaseweazle — the recommended controller, hardware-validated for reading and writing.
DrawBridge (Arduino Amiga Floppy Reader/Writer) — also supported; the app auto-detects the controller type. Not yet verified against real DrawBridge hardware.
Mount Floppy (Read & Browse) — read the disk and browse it immediately as an ADF.
Read Floppy → ADF — save a disk as an .adf (DD 880K or HD 1.76M).
Write ADF → Floppy — write an .adf back to disk, verified by default.
Raw flux (SCP) — image a whole disk to a SuperCard Pro .scp file or write one back, for copy-protected or non-AmigaDOS disks. (IPF is not supported.)
Drive options live in Settings → Floppy: bus type, drive unit, read
revolutions and retries, verify-after-write, motor and head-settle timing, default
density. If a read fails with noTrk0, try the other bus
type or drive unit 1 (PC drives on a twisted cable
usually answer as unit 1).
11. Quick Look previews
Amiga Imager previews Amiga files right in Finder (select a file,
press Space) and inside the File Manager:
Images and icons — IFF .iff/.ilbm pictures and Workbench .info icons render as images.
Disk images and archives — .hdf, .img, .adf, and .lha show an info card: partitions with volume name, size, and free space, plus an expandable tree of the contents.
To act on a file, use Finder's right-click → Open With → Amiga Imager:
.hdf/.img open in the File Manager;
.lha/.adf extract to a folder next to the file (a handy
replacement for The Unarchiver for these formats — use Get Info → Change All
to make double-click extract).
Enable the previews once under System Settings → General → Login Items &
Extensions → Quick Look; the button in Settings → Build → Quick Look
Previews takes you straight there.
12. The package manager (amipkg)
Every image Amiga Imager builds ships with amipkg — a package manager
for AmigaOS 3.x, in the spirit of Homebrew or apt. It installs, updates and removes
software from AmigaPKG, a curated, cryptographically
signed catalog of 200+ freely distributable classics and tools — straight on
the running Amiga. It also works on any other 3.x system, from a stock A500
up: the standalone amipkg.lha is a free download at
github.com/thomas-luebker/amiga-pkg
(and on Aminet). Extract it into a drawer of your choice and run
Install (self-contained — everything stays in that
drawer, nothing else on the system is touched) or
Install-System (additionally adds the
AMIPKG: assign and Shell path to S:User-Startup as one
clearly marked, removable block).
On the Amiga
amipkg lives in one home drawer —
SYS:Tools/AmigaImager on built images, published as the
AMIPKG: assign. CLI, both GUIs, the signed catalog, the
download cache and the receipt database all sit together there (like
MUI:), so amipkg’s self-update always lands on the binaries
actually in use:
AMIPKG:amipkg-mui — the MUI front-end (needs MUI 3.8+,
no extra custom classes): a toolbar with the catalog and package actions, a sidebar
with View (Installed/Available) and Categories panes for one-click
filtering, sortable list columns, a description pane, and a status bar with live
catalog counters. A failed operation pops the full error message in a requester.
AMIPKG:amipkg-gui — the GadTools front-end: the same
features in a simpler dress, runs on any stock 3.x system with zero dependencies.
amipkg — the CLI both GUIs drive; with the default
integrated setup it is on the Shell path, so it works from any Shell.
The essentials:
amipkg update (fetch the latest catalog), avail,
info <id>, install <id> (add
DRYRUN to preview the plan without changing anything),
check, upgrade, remove <id>,
adopt, doctor (audit installs against the receipts) and
dir (show or set the install drawer). Full documentation ships on the
image as an AmigaGuide (AMIPKG:amipkg.guide, also in the GUIs’
Documentation menu).
On built images amipkg also appears in the WBDock (the MUI front-end
when MUI is installed, GadTools otherwise), and GlowIcons builds get a proper colour
amipkg icon.
Installing, updating, removing
Installing resolves dependencies automatically — an app needing MUI or
AmiSSL pulls it in first, with the right CPU build for the machine — and shows the
resolved plan (packages + download sizes) before anything happens. amipkg checks the
package’s hardware floors (CPU, Kickstart) and free disk space up front and
refuses clearly instead of installing something that cannot run; interrupted downloads
resume where they stopped. Each app lands in its own drawer inside the
install directory — and that directory can be any drawer on any drive,
not just the boot partition: default SYS:Programs, changeable with
amipkg dir (e.g. amipkg dir Work:Software). Archives without
a top-level drawer of their own are wrapped automatically, so loose files never pile up.
Everything is recorded in a receipt database: remove
deletes exactly what was installed, including its User-Startup lines, and
doctor audits the installed files against the receipts. Already have an
app installed somewhere? amipkg adopt <id> <drawer> takes over
managing it in place — updates then land in that drawer, not in
SYS:Programs. amipkg keeps itself current the same way:
amipkg upgrade amipkg updates the running installation in place.
Downloads need a TCP/IP stack (Roadshow, or an emulator’s bsdsocket); browsing the
bundled catalog works offline. The catalog and almost all archives are reachable over
plain HTTP, so no TLS stack is required; packages on https-only hosts additionally need
AmiSSL 5.x (which amipkg can install for you).
Integrated, self-contained — or not at all. Both choices live in
Settings → Packages → Package Manager: Integrate into the
system at boot (default on) makes the boot scripts set the
AMIPKG: assign and put the drawer on the Shell path. Turned off, the
image gets a fully self-contained amipkg: nothing is wired at boot, the
programs find their data next to their binaries, and everything stays inside the
drawer. And amipkg itself is entirely optional — switch off
Install the package manager on built images and Amiga Imager builds
completely amipkg-free images, exactly as before this feature existed.
The AmigaPKG catalog
The catalog behind amipkg is an open project of its own:
github.com/thomas-luebker/amiga-pkg.
Every entry pins the exact archive (SHA-256, size, mirrors) with honest CPU/Kickstart
floors and dependencies, and the whole index is re-verified against the upstream
sources and re-signed automatically every night — new upstream
releases reach your Amiga without anyone lifting a finger. Missing a program? Package
submissions are simple pull requests (a single JSON file; the repo’s
PACKAGING.md explains every key in about five minutes).
Contributing from the Amiga
The catalog is not a one-way street: since amipkg 0.6.x your Amiga can
author submissions itself. Both GUIs offer
Submit a Package… (a small form: package id, archive URL, category,
description), and the Shell equivalent is
amipkg submit <id> <archive-url> [CAT=<Category>] [description].
The submitting machine downloads the archive, computes the SHA-256 pin
on-device, and sends the draft in; a courier verifies the pin against an
independent download, validates the entry, and opens a review branch. A maintainer
still reviews the license and signs everything offline before it reaches any
catalog — the Amiga is the authoring tool, never a trust shortcut. Duplicate ids
are refused instantly on the Amiga (new versions of existing packages are picked
up automatically by the nightly refresh — no submission needed).
Trust
The catalog is signed with an Ed25519 key and verified on the Amiga
against a built-in public key; every download must match the SHA-256 recorded inside
that signed catalog. A tampered catalog or archive is refused — the download host is
never trusted, which is exactly why plain HTTP is safe here.
Manage Amiga Software (on the Mac)
The same package management, without booting the Amiga: click
Software in the main window's top bar (or Shift-Cmd-P) to open
Manage Amiga Software, open a built .hdf/.img,
and see every installed package with its version and update status. Search the catalog,
install (dependencies resolved, just like on the Amiga), update one or all, remove, or
change the install drawer — presets, one entry per drive of the image, or any custom
path like Work:Software via the Install Drawer menu. The window edits the
image’s receipt database directly, so the Amiga and the Mac always agree about
what is installed. The catalog
refreshes automatically from the signed online index.
Updating Emu68 on a PiStorm image or card
When Emu68 moves on, a PiStorm system you have been using for months does not need a
rebuild. Open its image — or the card itself — in Manage Amiga Software
and an Emu68 bar appears above the package list. It shows:
the installed Emu68 release and the PiStorm board it is set up for;
the installed VideoCore.card version;
where that information came from — recorded at build for images built by a
current version, or detected for older images, which are read from the kernel
and config.txt. If the board cannot be told for sure, the bar asks you to
pick it instead of guessing;
the channel: Stable releases or Prereleases (beta).
Switching is always your explicit choice in the bar's channel menu;
and whether a newer release exists on that channel — up to date, the newer
version, or a plain reason why no update is offered.
Update to … replaces the Emu68 kernel, the Pi firmware and the
overlays on the EMU68BOOT partition (and, for Emu68 1.1, the matching
VideoCore.card). Everything is downloaded and checked before anything is
written. Never touched: your Kickstart ROM (kick.rom),
your Wi-Fi settings (wpa_supplicant.conf), and everything on the Amiga
partitions. config.txt is left alone too — it is regenerated
only when an update moves the system from Emu68 1.0 to 1.1, which
needs the new format; your HDMI mode, USB and FrameThrower settings are carried over.
The bar says so in words when an update is such a move.
Updates only go forward. Before every update the current Emu68 is
saved into one backup slot on the boot partition
(EMU68BOOT:Emu68Backup/), and the bar then offers
Restore … to put it back. Restoring uses up that backup, and the next
update replaces it — there is only ever one previous version to go back to. Going from
1.1 back to 1.0 is done with Restore, never with an update. Images that need Emu68 1.1
(PiStorm16, FrameThrower, USB) are never offered a 1.0 release.
SD and CF cards.Open Card… in the Manage Amiga
Software toolbar lists the external cards connected to the Mac; pick yours and macOS
asks for your password once. The card stays unmounted while it is open there. This
also means a PiStorm card that no longer boots after an update can be fixed by putting
it back in the Mac and choosing Restore.
Updating a real card is new in 0.99.12. Back up the card before you update
it — for example by reading it into an image file with a disk-imaging tool —
so nothing you care about depends on the update going right.
13. The Amiga Fleet console
Amiga Fleet is a board of every Amiga on your network that runs
amiagent, the small network daemon from the package list. Each machine
gets a tile with its online status, response time, agent version, CPU, Kickstart and
memory, and from the tile you open its live screen, a shell, and file transfer —
without walking over to the machine. Open it with Shift-Cmd-L, the
menu item Amiga Fleet…, or the Amiga Fleet button in
the main window's top bar.
What you need
amiagent 0.10.0 or newer running on each Amiga. Select
amiagent in the package list when you build the image, and turn on
Settings → Remote Access → Start amiagent at boot to have it start
automatically; it can also be started from its Workbench icon.
A token — the shared password the agent was started with. The
console sends it with every request.
Network: the Amiga needs a working TCP/IP stack (on PiStorm, see
bringing the network up at boot) and must be on the
same local network as the Mac. The agent listens on port 7846 by default. The first
time the console scans or connects, macOS asks whether Amiga Imager may use the
local network — allow it.
Adding machines
Scan LAN (or Scan my network on an empty board) sweeps
the Mac's local network for agents on port 7846; enter the token your agents use and
every machine that answers is added. Add… adds one machine by hand —
name, host address, port and token. Right-click a tile to open its windows,
Edit… its details or Remove it;
Refresh updates the whole board.
Per-machine windows
VNC — a native, full-colour view of the Amiga's screen with mouse
and keyboard, built into Amiga Imager. It uses AmiVNC on the Amiga; if AmiVNC is
missing, the window offers Install AmiVNC (installed with amipkg)
and starts it for you. Fast switches to a low-bandwidth 256-colour
mode that is much quicker on a real 68k machine; Fit /
1× choose the scaling, and the window can go full screen.
Drag & drop file transfer — drop files from the Finder onto
the VNC view and they are copied to the Workbench drawer under the pointer (the
target is shown while you drag; with no drawer under the pointer they go to
RAM:). For the other direction, tick Files: a panel
lists the Amiga's drives and drawers, and you drag a file to the Finder or click
its save button. Large files are transferred in chunks with a progress readout.
Screen — a lighter live view that works without AmiVNC: it fetches
a new picture only when the screen changes, and forwards mouse and keyboard.
Inspect opens a side panel with the windows and gadgets on the
front screen; click a gadget there to press it on the Amiga.
Pause stops the updates.
Report — the machine's system report next to an
AmigaDOS shell: type a command, press Return, and it runs on that
Amiga with its output and return code shown above the prompt.
ARexx — the agent also runs ARexx scripts through its own
AMIAGENT port, which lets it drive programs that have no ARexx port of
their own. The one-click Unfreeze IMP button in the Report window
(for the IMP3 player) is one such script.
Encryption and trust
amiagent creates its own TLS certificate the first time it runs, and the console uses
an encrypted connection whenever the agent offers one. Because that certificate is
self-signed, the console trusts it on first use: the first connection
to a machine remembers its certificate fingerprint, and every later connection must
present the same one. If it changes, the connection is refused — just like SSH's
host-key check. If you reinstalled amiagent on purpose, that is expected; if you did
not, find out why before going on. An agent without TLS is reached unencrypted.
Security: amiagent runs whatever it is sent
amiagent exists to let another computer drive the Amiga: it runs any command
it receives, reads and writes files, and controls the mouse and keyboard.
Treat it accordingly:
Always use a token. Without one, anything on your network can run
any command on the Amiga — including formatting it. If the token in
Settings → Remote Access is empty, the build writes no amiagent boot line and says
so.
Use a token you use nowhere else. It is stored in plain text in
S:User-Startup on the image and can travel unencrypted.
Keep the Amiga on a local network you trust, and
never forward the agent's port through your router.
14. Settings reference (Cmd+,)
Build — build behavior, Aminet exposure, setting the clock from the internet, UserFiles auto-discovery, asset folder override, Quick Look previews, and the daily app update check (a signed version manifest, verified before trust; notification only — the app never updates itself; also available manually via Amiga Imager → Check for Updates…).
Packages — the Package Manager (install amipkg on images, default on; and its boot integration: integrated = AMIPKG: assign + Shell path at boot, or self-contained in its drawer), the Build Download Cache (cache on/off, offline mode, re-download, per-cache clear) and Custom Packages (register your own LHA archives as installable packages).
Remote Access — amiagent (start it at boot, its token and port) and the Home Assistant client (ami2ha). Tokens live in the macOS Keychain, never in a saved profile. See chapter 13 for what amiagent allows and why the token matters.
Storage — SD Card Size Reduction presets so images fit real media, Card Writing (erase confirmation, verify after write), and Partition Device Names (customize SDH0/DH0-style device names).
PiStorm — Bring the network up at boot (default on, see below), boot-bundle source, Emu68 prerelease opt-in (PiStorm16, FrameThrower and USB builds use Emu68 1.1 automatically), optional firmware URL override, floppy buffers, and Auto-mount EMU68BOOT: (default on).
Classic — A314 auto-mount and optional DEVS:a314.config, and Controller Compatibility (MaxTransfer, Mask).
Floppy — controller and drive selection, read reliability, timing, density (see chapter 10).
Debug — diagnostic output and developer-oriented behavior.
If you keep the defaults, you can ignore most of these — they matter when matching specific hardware or tuning repeated workflows.
Bringing the network up at boot (PiStorm)
Settings → PiStorm → Network → Bring the network up at boot, on by
default. It writes S:Network-Startup, which S:User-Startup
already runs at boot, so the Amiga is on the network without you typing anything.
The interface follows the build: the Pi's ethernet (genet), or WiFi
(wifipi) if you set an SSID. A WiFi build tries the ethernet port as
well, after WiFi is up, so a cable works there too.
The add is QUIET under FailAt 30, so if something else
raises the same interface later — Roadie, or PiStorm Online — the duplicate is
silent and cannot fail the script.
Turn it off if you would rather connect by hand. Be aware what that means: the
machine boots with no network at all, and anything that needs one fails
with it. amiagent is the common casualty — it needs
bsdsocket.library to bind its port and exits without one, so the
machine comes up unreachable and the agent looks broken when it is not. With the
setting off, the build log says so explicitly rather than skipping in silence.
(When amiagent starts at boot, it is tried again every 10 seconds for five minutes,
so a network that comes up late or a cable plugged in later still works.)
Setting the clock from the internet
Settings → Build → Set the Amiga's clock from the internet, on by
default. A PiStorm has no battery clock, and on many classic Amigas the battery is
long gone, so without it the machine starts with an old date every time — wrong
file dates, and secure web pages fail once the date falls outside a certificate's
validity.
Every image with a network (PiStorm and Classic with Roadshow, MiSTer with PPP,
UAE and Amiberry) gets sntp from Aminet and S:NTPSync.rexx.
It sets the clock as soon as the network answers and every hour after, and on a
machine that has a clock it sets that too. The server is your choice under
Time server: the worldwide NTP Pool (pool.ntp.org,
the default), a regional pool, Cloudflare, Google, Apple, PTB or NIST — or
Custom… for your own, for example your router. A custom entry
must be a server name or IP address; anything else falls back to
pool.ntp.org. The time zone
is your Mac's, summer time included: the build writes the switch dates for the
next 25 years into the script. The log is in T:ntpsync.log; delete the
NTPSync lines in S:User-Startup to turn it off on the Amiga.
15. Power-user guide
Simple mode and the Guided Build are the on-ramps; this chapter is the deep end —
full control over partitions, filesystems, and repeatable builds. Everything here
lives in Advanced mode unless noted.
The partition layout editor
In Advanced mode the Image & Build card exposes the complete
partition layout: a proportional partition bar you can click to select, plus
per-partition controls. For each partition you set:
Device name and label — SDH0/DH0-style
device names follow your naming scheme from Settings → Storage → Partition
Device Names; the label is the volume name on Workbench.
Size — a fixed size, or Use remaining to absorb
whatever the other partitions leave (one per layout; it needs at least
256 MiB).
Filesystem — FFS (DOS1),
FFS Intl (DOS3), or PFS3 (PDS3), with the
filesystem's allowed block sizes (FFS defaults to 2048 B for
speed; PFS3 to 512 B).
The partition budget readout keeps the layout honest: usable RDB
space, the fixed allocations, what remains — and on PiStorm the effective FAT boot
partition alongside the Amiga space. Invalid layouts are flagged in place and in the
Build Summary, with the reason spelled out.
Filesystems: FFS and PFS3
FFS comes from your own OS media — the build extracts
FastFileSystem from your ADFs/ISO and embeds it in the image's RDB, so the image
is self-contained. An FFS partition larger than 2 GiB is
automatically upgraded to the long-filename DOS7 FFS variant at
build time (plain DOS1/DOS3 above 2 GiB is unreliable); the editor shows a
notice when this will happen.
PFS3 uses the pfs3aio handler (downloaded
automatically and cached), likewise embedded in the RDB. To use a newer one, choose
it — the handler itself or its .lha — under Settings → Build →
PFS3 handler. It is fast and robust for
big data partitions, with one hard limit: 101.6 GiB per
partition — the layout validator blocks anything larger and tells you to
cap the partition or use FFS.
Mixing is fine and often ideal: a modest FFS boot partition plus large PFS3 data
partitions is the classic power-user layout.
Blank images — structure without an OS
Build blank image (the mode picker next to the workflow tabs) builds
the partitioned, formatted disk without installing AmigaOS — and optionally
pre-fills it:
Each partition in the editor can be assigned a source folder on
your Mac; its contents are copied to that partition's root, and the partition can
size itself automatically from the source.
On PiStorm, the FAT boot partition is still fully prepared —
Emu68 firmware, config.txt, your kick.rom — so a blank
PiStorm card boots Emu68 and presents the empty Amiga partitions.
FFS and DOS7 partitions still need their filesystem handler: choose an ADF folder
or OS ISO so FastFileSystem can be embedded. PFS3 needs no media (pfs3aio downloads
automatically) — unless the card carries a boot menu, whose own partition is always
FFS.
Typical uses: a second data card for a machine that already boots, migrating an
existing installation's files onto fresh media, or preparing a large games/data
disk to pair with the File Manager. (OS-dependent extras —
packages, WHDLoad games — are skipped; there is no OS to host them.)
Profiles and repeatable builds
Save Profile / Load Profile (bottom of the build
screen, Advanced mode) snapshot the entire configuration as a .json file
— hardware, media paths, packages, partition layout, everything. Load one to
reproduce a build exactly, keep one per machine you maintain, or drive unattended
builds from the command line with --build-profile
(Appendix B). Profiles also carry the build options from the
Settings window. Passwords and tokens are never written into a profile — loading
one keeps your own. Since v0.99.12 profiles are saved in a new format: older profiles
still load, but an older version of the app cannot open a profile saved by v0.99.12 or
later.
Hardware fine-tuning
MaxTransfer and Mask (Settings → Classic → Controller
Compatibility) — for picky IDE/SCSI controllers and CF adapters; the
defaults are safe for common setups (see chapter 5).
Custom screen mode (Display section) — instead of a preset,
specify the exact resolution; it is written directly into the image's
screenmode.prefs, and on PiStorm also into the HDMI timing in
config.txt.
Custom packages (Settings → Packages) —
register your own LHA archives; they install to
SYS:Programs/<Name> like any built-in package.
SD Card Size Reduction (Settings → Storage) —
the safety margin that keeps a "128 GB" image inside what real cards
actually hold; raise it if a write reports a too-small card.
16. Troubleshooting
The build cannot start
The Build Summary lists the exact blocker. The most common causes: missing install
media, missing Kickstart ROM, no output path — or, for AmigaOS 3.9, a missing Boing
Bag; for 3.2.2+, a missing Update disk (see below).
Under FS-UAE, programs fail for no obvious reason
Symptoms that look unrelated but share one cause: the package manager reports
“Catalog update failed (rc 10) — no output”, AmiSSL-based programs insist
“AmiSSL 5.x is required” although it is installed, or an application simply
refuses to start. The machine has run out of Fast RAM.
First check: are you launching with the generated .fs-uae file? It requests
256 MB of Zorro III Fast RAM (plus the RTG board and bsdsocket networking).
FS-UAE reads none of the .uae keys, so a hand-rolled config
— or an image built by an older version, which wrote only the .uae —
leaves you on 8 MB of Zorro II Fast RAM. In that case add to your FS-UAE
configuration:
zorro_iii_memory = 262144
On 8 MB, a loaded Workbench with MUI, the dock and a stats window leaves only a few
megabytes. A program that cannot be started at all usually reports nothing rather than
an error, which is why the message rarely mentions memory.
The image drops to a shell: “must be booted from Kickstart ROM 3.2 (V47)”
Your Amiga has a 3.1/3.1.4 ROM and the image was built without the 3.2.x
Update disk, so it has no soft-kick startup. Add
Update3.2.x.adf to your ADF folder and rebuild — see
the V47 rule in chapter 5. (Current versions block or warn about
this in the Build Summary before building.)
USB devices don't show up (PiStorm / Classic USB)
USB is started manually by design: open Trident (in the WBDock) and
click Online. Auto-starting the USB stack during boot can hang the
machine, so the app — like the wider Emu68 community — leaves the stack offline until
you bring it up. Also note that on a CM4, enabling FrameThrower
excludes USB from the build entirely (they share the one USB controller).
Writing to disk fails on macOS
Set up the Amiga Imager Disk Helper with Full Disk Access
(chapter 7), or grant Full Disk Access to Amiga
Imager itself and retry. Replugging the target device can also help.
Did I pick the right card?
Writing erases the whole card. The confirmation names the exact target — card name,
size, /dev node. Read it and cancel if it isn't the card you expect.
(Settings → Storage → Card Writing controls the confirmation.)
A WHDLoad game doesn't start
Many WHDLoad games need Kickstart images (kick 1.3 / 3.1) in
DEVS:Kickstarts — if a game quits straight back to Workbench or asks for a
kickstart, that's usually it. Set the WHDLoad Kickstarts folder and
rebuild (see chapter 3) — or copy the kickstart files into
DEVS:Kickstarts on the finished image with the
Amiga File Manager, no rebuild needed.
A314 does not work
Set the network stack to Roadshow Demo or Roadshow Full — A314 is not supported with None.
The image is too large for the card
Reduce the preset, adjust the custom size, or increase the margin in
Settings → Storage → SD Card Size Reduction. The app also compares
image size against the card before writing, so a mismatch fails fast rather than
hours in.
MiSTer (Minimig) PPP networking stays at 0.0.0.0
If the Roadshow PPP log shows Local IP address stuck at
0.0.0.0 with repeated IPCP configuration request reject messages,
the MiSTer's Linux side is not handing out an address. Edit
linux/ppp_options on the MiSTer SD card and:
Uncomment the explicit IP pair near the bottom, e.g. 192.168.1.1:192.168.1.254 (local:remote) — on many images the automatic assignment does not work. proxyarp (already enabled) then puts the Amiga on your LAN.
Uncomment -vj to disable Van Jacobson compression — this stops the Configure-Reject loop.
Optionally set ms-dns <your-router> for name resolution.
Keep crtscts active, confirm the OSD has UART = PPP at
115200, then re-up the Amiga's PPP interface. Always eject the card
cleanly from macOS before moving it back to the MiSTer.
You need help diagnosing a problem
Use Export Log after the failure and keep the Build Summary details —
that captures the exact configuration of the build. Every build writes its own
timestamped log file to ~/Library/Logs/Amiga-Imager/, so a failed build's
log survives even after you rebuild — the Previous Logs button next to
Export Log opens that folder in the Finder.
AmigaOS 3.2 (base) — ADF source folder or the 3.2 CD ISO (with its ADF/ folder).
AmigaOS 3.2.1 / 3.2.2 / 3.2.3 — the 3.2 base (folder or CD ISO) plus the point release's ADFs — most importantly the Update disk (Update3.2.x.adf). Supply them in the ADF folder; when combined with a CD ISO, the folder's disks take precedence. The Update disk is required for machines with 3.1 ROMs (see the V47 rule).
AmigaOS 3.9 — the CD ISO plus Boing Bag 1 and Boing Bag 2 (.lha).
Kickstart ROM — a ROM matching your target. For OS 3.2 under UAE/Amiberry, a 47.x ROM is required. Encrypted Cloanto ROMs are not supported — the media check detects them and blocks the build; decrypt the ROM first (Amiga Forever includes the tooling) and supply the plain ROM file.
Appendix B: command-line (headless) builds
Amiga Imager can run a build from the command line — no window — driven by a saved
build profile. This is handy for scripting, repeatable batches, or
running the same build unattended.
First create the profile: set everything up on the build screen the way you want it,
then click Save Profile (in Image & Build,
Advanced mode) to write a .json file. Then invoke the app binary inside the
bundle with --build-profile:
The profile carries the whole configuration; these flags override individual paths so one profile can be reused:
--build-profile <path> — the saved profile (required).
--output <path> — output image path.
--assets <path> — Assets folder.
--install-media <path> — install ISO.
--kickstart <path> — Kickstart ROM.
--adf-dir <path> — ADF source folder.
--help — show usage.
Both Build bootable image and Build blank image profiles are supported;
Flash existing image is not (it needs an interactive card selection). The build
log is written to ~/Library/Logs/Amiga-Imager/, and the process exits with a
non-zero status if the build fails — so it fits cleanly in a shell script.
Tip: after upgrading the app, re-save older profiles once so any newly added path fields
are stored.